
Models fitted with air conditioning.
- Make
- Land Rover
- Model
- Freelander Workshop Manual
- Year
- 1998–2000
- Section
- Repairs › Models fitted with air conditioning.
Engine - L SeriesModels fitted with air conditioning. · page 1 of 2
Models fitted with air conditioning.
- Fit compressor to water pump housing and tighten bolts to 45 Nm.
- Connect multiuplug to A/C compressor.
All models
- Connect hose to intercooler and tighten clip.
- Align earth lead to gearbox and tighten bolt to 45 Nm.
- Fit gear selector rod to gearbox and steady rod to IRD adaptor plate.
- Fit NEW roll pin to selector rod and fit clip to retain roll pin.
- Fit bolt securing steady rod to IRD adaptor plate and tighten to 25 Nm.
- Position propeller shaft to IRD drive flange and align reference marks.Tighten nuts and bolts to 40 Nm.
- Fit exhaust front pipe. See MANIFOLD & EXHAUST SYSTEMS, Repairs.
- With assistance, use a transmission jack and position rear beam under vehicle.
- Fit bolts securing beam to body. Tighten 2 front bolts to 190 Nm. and 4 rear bolts to 105 Nm.
- Connect links to anti roll bar and tighten nuts to 45 Nm.
- Align engine lower tie bar to bracket on sump and tighten bolt to 80 Nm.
- Ensure lower arm ball joint tapers are clean and connect swivel hubs to lower arms. Tighten ball joint nuts to 65 Nm.
- Fit front drive shafts. See DRIVE SHAFTS, Repairs.
- If required refill engine with oil. See MAINTENANCE.
- Refill IRD unit with oil. See MANUAL GEARBOX, Adjustments.
- Refill gear box with oil. See MANUAL GEARBOX, Adjustments.
- Refill cooling system with coolant. See COOLING SYSTEM - ’L’ SERIES, Adjustments.
- Fill PAS system with PAS fluid. See STEERING, Adjustments.
- Fit bonnet. See BODY, Repairs.
MOUNTING - ENGINE - LH
Service repair no - 12.45.11
Remove
- Remove underbelly panel. See BODY, Exterior fittings.
- Remove air filter assembly. See ENGINE MANAGEMENT SYSTEM - EDC, Repairs.
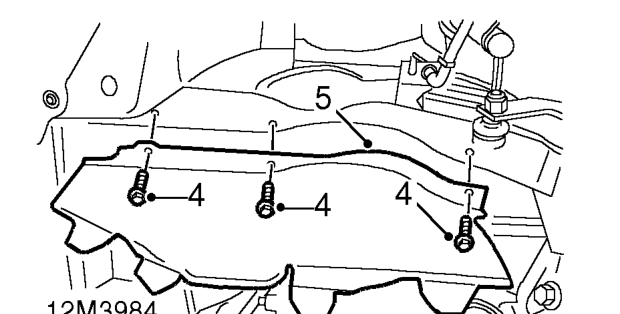
- Remove LH front wheel.
- Remove 3 bolts securing LH splash shield.
- Remove LH splash shield.
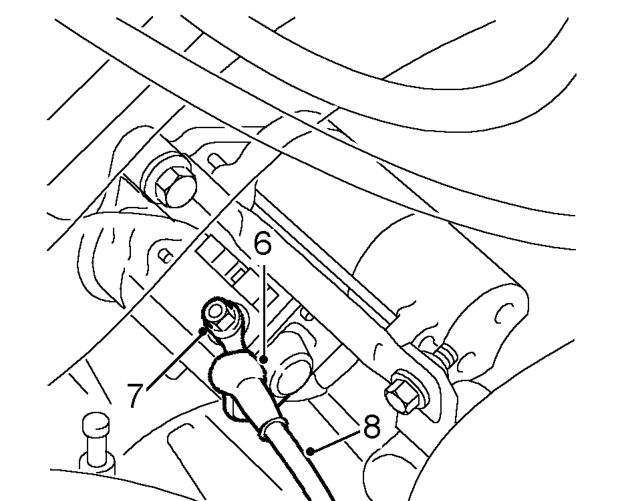
- Release cover from battery lead terminal on starter motor.
- Remove nut securing battery lead to starter motor terminal.
- Release battery lead from starter motor terminal.
Parts & tools for this job For 1998 Land Rover Freelander
- TOOLA/C manifold gauge setSearch: AC manifold gauge set
- TOOLUV leak detection kitSearch: AC UV leak detection kit
- PARTCabin filterSearch: Land Rover Freelander 1998 cabin filter
Links open Amazon search results in a new tab. As an Amazon Associate I earn from qualifying purchases.