
Engine and gearbox (page 8 of 8)
- Make
- Rover
- Model
- 200 Workshop Manual
- Year
- 1995–1999
- Section
- Repairs
Engine - K8Engine and gearbox · page 8 of 8
Refit
- Connect hoist to tool 18G 1598.
- Using assistance, raise engine and manoeuvre into position in vehicle.
- Adjust tool 18G 1598 so engine is horizontal in engine compartment.
- Fit engine RH mounting through bolt but do not tighten.
- Fit engine LH mounting. See this section.
- Connect steady bar to engine, fit through bolt and tighten bolt to 45 Nm.
- Tighten through bolt securing engine steady bar to subframe to 80 Nm.
- Tighten engine RH mounting through bolt to 80 Nm.
- Lower hoist and disconnect tool 18G 1598 from engine lifting brackets.
- Remove lifting brackets 18G 1592 from engine.
- Clean gear selector linkage and gear selector linkage ball joints.
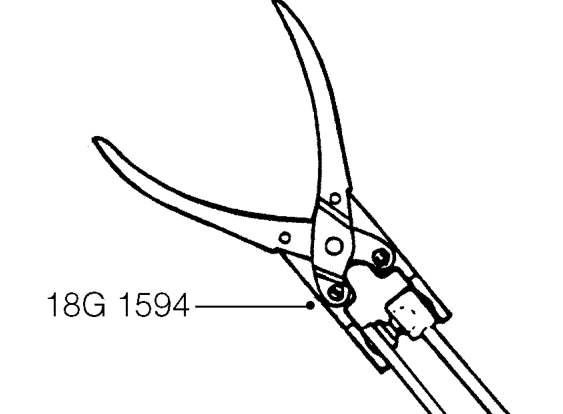
- Using tool 18G 1594 connect gear selector linkage ball joint to gear selector lever.
- Using tool 18G 1594 connect gear change linkage ball joint to gear change lever.
- Connect drive shafts to gearbox, as detailed in Differential oil seal. See MANUAL GEARBOX - ’R65’, Repairs.
- Position fuel return hose through clips under inlet manifold and connect to fuel rail, secure with clip.
- Lubricate new ’O’ ring with silicone grease and fit to fuel feed pipe.
- Connect feed pipe to fuel rail and tighten bolts to 5 Nm.
- Connect hose to coolant rail and tighten clip.
- Connect hose to thermostat housing and tighten clip.
- Connect coolant hose to inlet manifold and tighten clip.
- Connect multiplug to inertia switch and secure clip on harness to bracket.
- Connect engine harness multiplugs to main harness.
- Connect ECM vacuum pipe to inlet manifold.
- Connect brake servo vacuum pipe to inlet manifold.
- Fit evaporative emission canister. See EMISSION CONTROL, Repairs.
- Connect throttle cable to throttle cam.
- Secure throttle cable adjusting nut to abutment bracket.
- Connect front pipe to manifold. See MANIFOLD & EXHAUST SYSTEMS, Repairs.
- Connect multiplug to HO2S.
- Connect multiplug to radiator cooling fan.
- Connect engine harness multiplug to main harness.
- Position engine harness earth lead to bonnet platform and tighten bolt to 9 Nm.
- Feed clutch cable through abutment bracket and connect to clutch release lever.
- Connect heater hose to coolant outlet elbow and tighten clip.
- Connect radiator bottom hose to coolant rail and tighten clip.
- Connect radiator top hose to coolant outlet elbow and tighten clip.
- Position battery tray in vehicle.
- Tighten 3 bolts securing battery tray to body, to 10 Nm.
- Fit engine compartment fuse box. See ELECTRICAL, Repairs.
- Fit 4 bolts securing battery tray to body and tighten to 10 Nm.
Parts & tools for this job For 1995 Rover 200
- PARTEngine gasket setSearch: Rover 200 1995 engine gasket set
- TOOLTorque wrenchSearch: 3/8 inch torque wrench
- TOOLFeeler gauge setSearch: feeler gauge set
Links open Amazon search results in a new tab. As an Amazon Associate I earn from qualifying purchases.