
Gearbox assembly (page 8 of 9)
- Make
- Rover
- Model
- 800 Workshop Manual
- Year
- 1996–1999
- Section
- Repairs
Manual gearbox - PG1Gearbox assembly · page 8 of 9
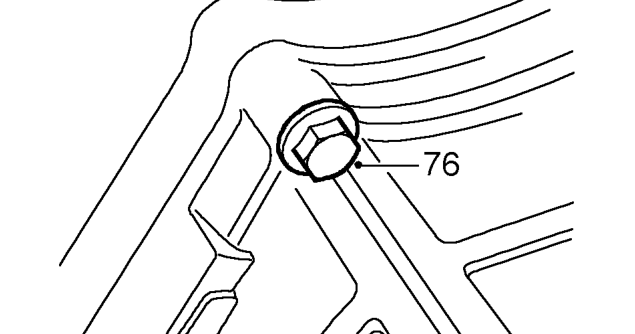
- Remove top bolt securing gearbox to engine.
- Move LH drive shaft clear of gearbox.
- Release gearbox from 2 dowels.
- Manoeuvre and lower gearbox to floor.
Refit
- Raise gearbox, align to dowels and secure to engine.
- Fit top bolt securing gearbox and tighten to 45 Nm.
- Position engine front mounting ensuring bracket location pip is at the front.
- Fit mounting bracket to mounting, align bracket to gearbox, fit bolts and tighten to 85 Nm.
- Align mounting to crossmember, fit bolts and tighten to 45 Nm.
- Align coolant pipe to crossmember, fit bolts and tighten to 25 Nm.
- Align rear engine mounting bracket to gearbox. Fit bolts and tighten to 45 Nm.
- Disconnect chains.
- Remove bolt securing lifting bracket. remove bracket, refit bolt and tighten to 45 Nm.
- Remove trolley jack.
- Position rear steady bar bracket.
- Fit bolts securing steady bar and tighten to 85 Nm.
- Fit steady bar and fit bolt securing steady bar to body.
- Align steady bar to bracket, fit through bolt and special nut. tighten both bolts to 85 Nm.
- Secure harness clip to bracket.
- Position coolant pipe to bracket, fit and tighten bolt to 10 Nm.
- Fit bottom bolt securing gearbox and tighten to 45 Nm.
- Position crankshaft position sensor heatshield, fit bolts and tighten to 45 Nm.
- Fit plain washer, dished washer, spacer and bush to tie rod.
- Fit tie rod, fit bolts securing tie rod to lower arm and tighten to 170 Nm.
- Fit outer rubber and dished washer to tie rod, fit nut and tighten to 90 Nm.
- Clean ends of drive shafts and fit new circlip to each shaft.
- Smear both differential oil seals with engine oil.
- Engage drive shafts in differential and push fully home. Pull joints to ensure circlips have fully engaged and shafts are retained.
CAUTION: Keep drive shafts horizontal to avoid damaging differential oil seals.
- Clean lower ball joint tapers and check to ensure boots are not damaged.
Parts & tools for this job For 1996 Rover 800
- PARTClutch kitSearch: Rover 800 1996 clutch kit
- TOOLClutch alignment toolSearch: clutch alignment tool
- FLUIDGear oilSearch: Rover 800 manual gearbox oil
Links open Amazon search results in a new tab. As an Amazon Associate I earn from qualifying purchases.