
R.r. boot floor
- Make
- Fiat
- Model
- 500 Factory Service Manual
- Year
- 2007–2024
- Section
- Removing-refitting › R.r. boot floor
R.R. BOOT FLOOR
Removing
Op. 7210B82 R.R REAR CROSSMEMBER
Op. 7210B70 R.R. REAR TRIM (STRUCTURAL ELEMENT)
- Ensure that the components connected are not distorted by checking the body alignment measurements with suitable equipment (reference rigs, templates or gauges).
- Straighten the body as necessary.
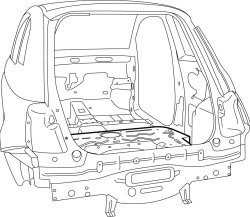
- Work on the right side of the luggage compartment/load platform.
- Use a rotary brush to remove the paint and gain access to the spot welds
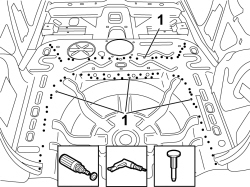
1. Use the drill to chamfer the spot welds shown in the diagram.
- Use a hammer and chisel to remove the previously chamfered spot welds.
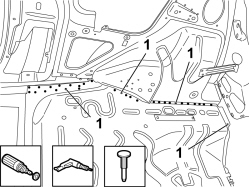
- Work on the left side of the luggage compartment/load platform.
- Use a rotary brush to remove the paint and gain access to the spot welds
1. Use the drill to chamfer the spot welds shown in the diagram.
- Use a hammer and chisel to remove the previously chamfered spot welds.
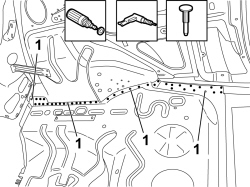
- Work on the front of the luggage compartment/load platform.
- Use a rotary brush to remove the paint and gain access to the spot welds
1. Use the drill to chamfer the spot welds shown in the diagram.
- Use a hammer and chisel to remove the previously chamfered spot welds.
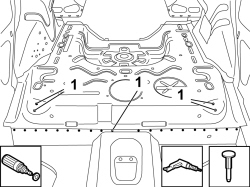
- Work on the centre of the luggage compartment /load platform.
- Use a rotary brush to remove the paint and gain access to the spot welds
1. Use the drill to chamfer the spot welds shown in the diagram.
- Use a hammer and chisel to remove the previously chamfered spot welds.
- Remove the luggage compartment/load compartment (rear part)
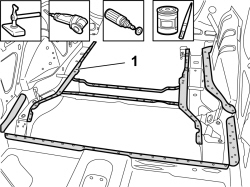
- Straighten the edges of the vehicle using a hammer and dolly block.
- Remove the spot weld residues using a disc grinder.
- Use a rotary brush to clean the previously treated areas.
1. Apply electro-weldable paint to the area shown in the diagram.
Refitting
1. Drill out the part at the indicated points.
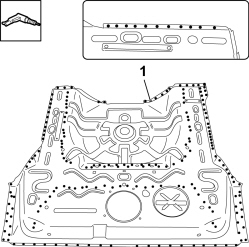
1. Remove the anti-corrosion treatment from the entire perimeter of the outside of the replacement part using a rotary brush.
- Apply electro-weldable paint to the edges involved.
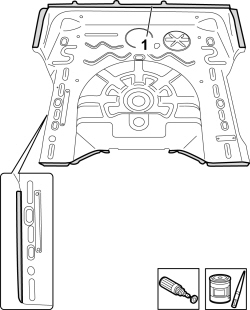
1. Position the replacement part correctly on the vehicle and secure it using self-locking clamps.
- Check the alignment and the surrounding gaps.
- Work on the front of the luggage compartment/load platform.
2. Fill weld the area shown using the MIG welder
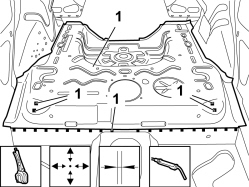
- Work on the left side of the luggage compartment/load platform.
1. Fill weld the area shown using the MIG welder
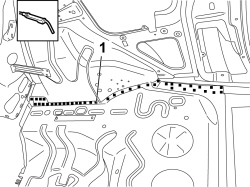
- Work on the right side of the luggage compartment/load platform.
1. Fill weld the area shown using the MIG welder
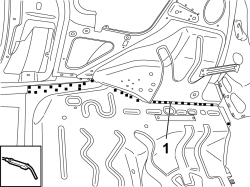
- Work on the centre of the luggage compartment /load platform.
1. Fill weld the area shown using the MIG welder
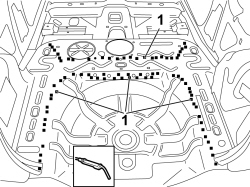
- Use a rotary brush to clean the previously welded areas.
- Apply rustproofing to the areas involved in the welding
Parts & tools for this job For 2007 Fiat 500
- TOOLTrim removal tool kitSearch: trim removal tool kit
- PARTTouch-up paintSearch: Fiat touch up paint
- PARTPanel clip assortmentSearch: Fiat panel clips assortment
Links open Amazon search results in a new tab. As an Amazon Associate I earn from qualifying purchases.