
Door - rear
- Make
- Land Rover
- Model
- Discovery II (UK)
- Section
- Repairs › Door - rear
DoorsDoor - rear
Refit
Door - rear
$% 76.28.02.99
Remove
- Release 'B' post lower trim casing and position aside. INTERIOR TRIM COMPONENTS, REPAIRS, Trim casing - lower - 'B' post.
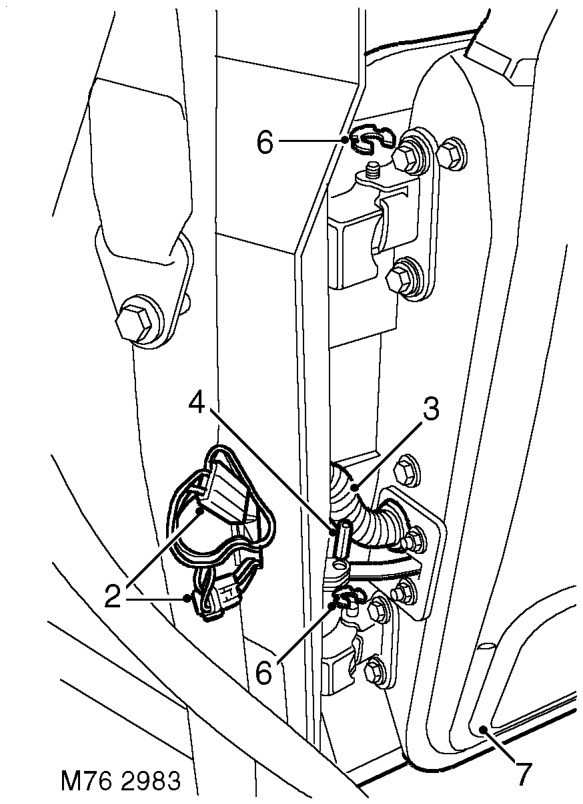
- Release multiplugs from within 'B' post and disconnect.
- Release harness sleeve and pull through 'B' post.
- Remove roll pin from check strap and discard.
- Release check strap from 'B' post.
- Remove 2 'C' clips securing door to each hinge.
- With assistance raise and remove door.
- With assistance position door to hinges.
- Fit 'C' clips to hinge pins.
- Position check strap to 'B' post and secure with new roll pin.
- Feed door harness through 'B' post and connect multiplugs.
- Connect harness sleeve to 'B' post and door.
6. Fit 'B' post lower trim casing. INTERIOR TRIM COMPONENTS, REPAIRS, Trim casing - lower - 'B' post.
- Check door for flush fit to adjacent panels and door edges for equal gap. If adjustment is necessary: a Open door. b Place a wooden block on jack and position jack to support door lower edge. c Loosen 4 bolts securing hinges to door. d Loosen 2 Torx bolts securing door latch striker. e Use jack to assist with door alignment. f Tighten hinge bolts. g Remove jack, close door and check for correct alignment. h When alignment is correct, tighten door hinge bolts to 30 Nm (22 lbf.ft). i Adjust door latch striker and tighten Torx bolts to 26 Nm (19 lbf.ft).
Parts & tools for this job For Land Rover Discovery
- TOOLTrim removal tool kitSearch: trim removal tool kit
- PARTTouch-up paintSearch: Land Rover touch up paint
- PARTPanel clip assortmentSearch: Land Rover panel clips assortment
Links open Amazon search results in a new tab. As an Amazon Associate I earn from qualifying purchases.