
Disassembly
- Make
- Land Rover
- Model
- Discovery II (UK)
- Section
- Overhaul › Disassembly
Engine - V8Disassembly
- Clean mating faces of rocker covers and cylinder heads. Gasket - exhaust manifold
- Fit new rocker cover gaskets, dry, position rocker cover, fit bolts and working in diagonal
$% 30.15.12.01 sequence, tighten to: l Stage 1 - 3 Nm (2.5 lbf.ft)
Disassembly
l Stage 2 - 8 Nm (6 lbf.ft)
- Ensure that outer rim of gasket is correctly positioned around periphery of rocker cover.
- Secure ht leads to rocker cover.
- Clean coolant outlet elbow mating faces.
- Lubricate and fit new 'O' ring to outlet pipe.
- Position coolant outlet elbow, fit bolts and tighten to 22 Nm (17 lbf.ft).
- Position alternator, fit mounting bolts and tighten to 45 Nm (34 lbf.ft).
- Position alternator cables and tighten terminal B+ to 18 Nm (13 lbf.ft) and terminal D+ to 5 Nm (3.5 lbf.ft).
- Position auxiliary housing, fit bolts and tighten to 40 Nm (30 lbf.ft). Fit nut and tighten to 22 Nm (17 lbf.ft).
- Clean jockey pulley mating faces.
- Position jockey pulley and tighten bolt to 50 Nm (37 lbf.ft).
- Clean PAS pump pulley mating faces.
- Position PAS pump pulley, fit bolts and tighten Reassembly
to 22 Nm (17 lbf.ft).
- Secure injector harness and connect injector multiplugs.
- Connect multiplug to coolant thermistor.
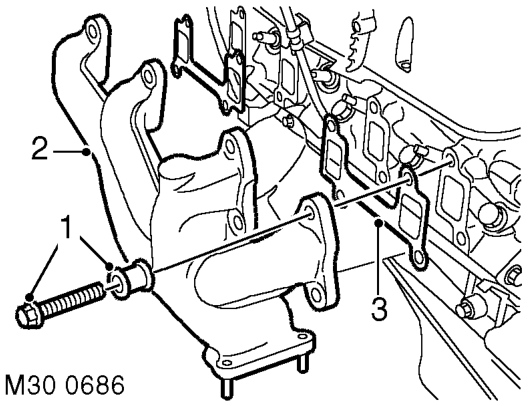
- Remove 8 bolts securing exhaust manifold and collect spacers. Discard the bolts.
- Remove exhaust manifold.
- Remove 2 manifold gaskets and discard.
- Clean exhaust manifold and cylinder head mating face.
CAUTION: Do not use a metal scraper or machined surfaces may be damaged.
- Fit new gaskets, dry, fit exhaust manifold. CAUTION: Ensure that link bar on gasket is positioned below spark plugs.
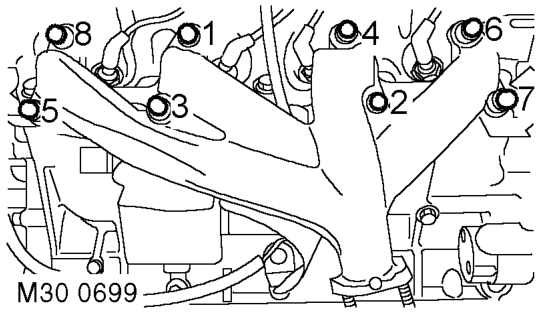
LH bank illustrated
- Fit spacers to new manifold bolts and, working in the sequence illustrated, initially tighten bolts to 15 Nm (11 lbf.ft), then finally tighten to 38 Nm (28 lbf.ft).
Parts & tools for this job For Land Rover Discovery
- PARTEngine gasket setSearch: Land Rover Discovery engine gasket set
- TOOLTorque wrenchSearch: 3/8 inch torque wrench
- TOOLFeeler gauge setSearch: feeler gauge set
Links open Amazon search results in a new tab. As an Amazon Associate I earn from qualifying purchases.