
Transfer box - V8 (page 3 of 3)
- Make
- Land Rover
- Model
- Discovery II (UK)
- Section
- Repairs
Transfer box - LT230SETransfer box - V8 · page 3 of 3
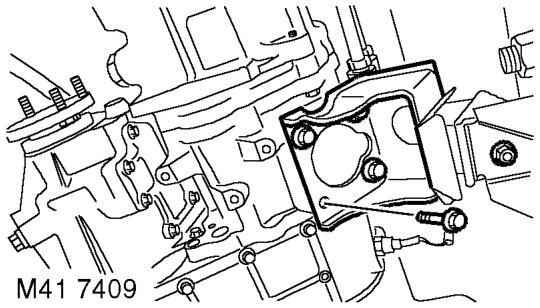
- Remove 4 bolts and nut securing RH mounting to body and transfer box.
- Remove nut securing LH mounting to body.
- Raise gearbox and remove RH mounting.
- With assistance, remove transfer box from gearbox.
- Remove input shaft oil seal. TRANSFER BOX - LT230SE, REPAIRS, Oil seal - input shaft.
Refit
- Fit new input shaft oil seal. TRANSFER BOX - LT230SE, REPAIRS, Oil seal - input shaft.
- Clean transfer box to gearbox mating faces.
- Raise transfer box on jack and align to guide studs LRT-41-009.
- Clean transfer box to gearbox bolt threads.
- Apply Loctite 290 to bolt and stud threads.
- Fit and lightly tighten 2 bolts and nut securing transfer box to gearbox. If new stud is to be fitted apply Loctite 290 to threads of stud and tighten to 45 Nm (33 lbf.ft)
- Remove guide studs, fit and lightly tighten 3 bolts.
- Tighten bolts and nut by diagonal selection to 45 Nm (33 lbf.ft.
- Position gearbox RH mounting and tighten bolts to 85 Nm (63 lbf.ft).
- Tighten gearbox RH mounting nut to 48 Nm (35 lbf.ft).
- Fit nut to LH mounting and tighten to 48 Nm (35 lbf.ft).
- Remove 4 bolts securing support plate to gearbox jack.
- Remove 4 bolts securing support plate LRT-99- 010 to transfer box and remove plate.
- Clean threads of bottom plate bolts.
- Apply Loctite 290 to threads of bolts.
- Fit 4 bolts securing bottom plate and tighten to 25 Nm (18 lbf.ft).
- Using new washers position breather pipe and tighten banjo bolt.
- Connect multiplug to transfer box neutral switch and secure harness.
19. If fitted - Connect Lucars to differential lock switch.
- Connect multiplug and Lucars to reverse lamp switch and oil temperature sensor.
- Position high/low ratio selector cable and secure with 'C' washer and clevis pin.
- Secure cable to fuel pipes with new cable ties.
- Clean handbrake back plate and mating face.
- Position handbrake back plate, fit bolts and tighten to 75 Nm (55 lbf.ft).
- Clean handbrake drum.
- Fit handbrake drum and tighten retaining screw.
- Fit front propeller shaft. PROPELLER SHAFTS, REPAIRS, Propeller shaft - front.
- Fit rear propeller shaft. PROPELLER SHAFTS, REPAIRS, Propeller shaft - rear.
29. Clean exhaust silencer and tail pipe mating faces.
- Position silencer and secure on mountings, using a new gasket align to tail pipe, fit nuts and tighten to 25 Nm (18 lbf.ft).
31. Position rear cross member, fit bolts and tighten to 26 Nm (19 lbf.ft).
- Refill transfer box with oil. MAINTENANCE, PROCEDURES, Transfer box.
- Fit front exhaust pipe. MANIFOLDS AND EXHAUST SYSTEMS - V8, REPAIRS, Front pipe.
Parts & tools for this job For Land Rover Discovery
- TOOLTorque wrenchSearch: 3/8 inch torque wrench
- TOOLSocket setSearch: socket set metric
- BOOKHaynes manualSearch: Haynes manual Land Rover Discovery
Links open Amazon search results in a new tab. As an Amazon Associate I earn from qualifying purchases.