
Cylinder head gasket - 97.5 my on (page 5 of 6)
- Make
- Rover
- Model
- 400 Workshop Manual
- Year
- 1995–2000
- Section
- Repairs
Engine - D SeriesCylinder head gasket - 97.5 my on · page 5 of 6
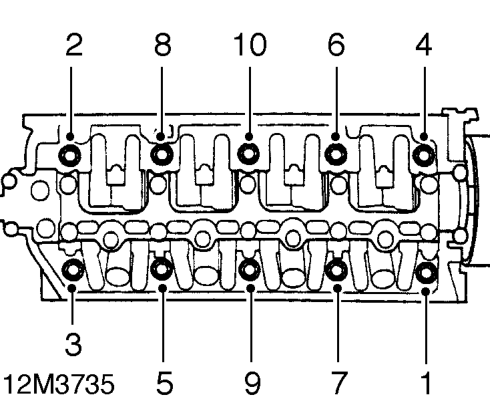
- Working in the sequence illustrated, progressively loosen cylinder head bolts. Remove bolts and special washers.
- With assistance remove cylinder head complete with manifolds.
- Remove and discard cylinder head gasket.
- Remove oil control jet.
Refit
- Thoroughly clean cylinder head and cylinder block mating surfaces.
- Clean oil control jet and ensure oil ways are clear.
- Fit control jet to cylinder block.
- Ensure both locating dowels are fitted to cylinder block.
- Fit new gasket to cylinder block.
CAUTION: Gasket must be fitted dry.
- Ensure ’UP’ mark on camshaft gear is at the top (TDC) position and the crankshaft timing marks are aligned.
- With assistance, carefully fit cylinder head onto cylinder block.
- Fit each cylinder head bolt with special washer and tighten finger tight only.
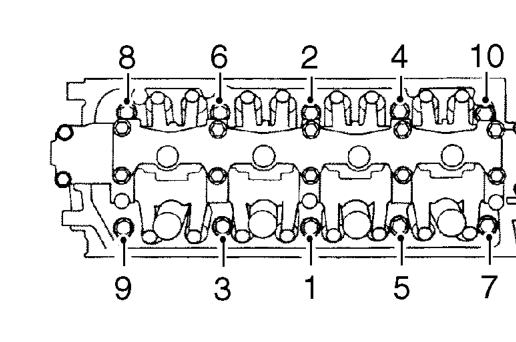
- Working in the sequence illustrated, tighten bolts in the following stages: Stage 1: Tighten bolts 1 - 10 to 20 Nm Stage 2: Tighten bolts 1 - 10 to 49 Nm Stage 3: Tighten bolts 1 - 10 to 67 Nm Stage 4: Tighten bolts 1 and 2 to 67 Nm
- With camshaft and crankshaft pulleys aligned to timing marks, fit belt to camshaft pulley.
- Loosen tensioner pulley bolt 1 turn.
- Turn crankshaft in an anti-clockwise direction 30° to tension belt. Tighten tensioner pulley bolt.
- Rotate crankshaft 5 turns anti-clockwise to centralise belt on pulleys and return to No 1 piston at TDC.
- Loosen pulley bolt 1 turn and rotate crankshaft in an anti-clockwise direction 30° to tension timing belt.
- Tighten pulley bolt to 44 Nm.
- Fit access plug to lower cover.
Parts & tools for this job For 1995 Rover 400
- PARTEngine gasket setSearch: Rover 400 1995 engine gasket set
- TOOLTorque wrenchSearch: 3/8 inch torque wrench
- TOOLFeeler gauge setSearch: feeler gauge set
Links open Amazon search results in a new tab. As an Amazon Associate I earn from qualifying purchases.