
Door - tail (page 2 of 2)
- Make
- Land Rover
- Model
- Discovery II (UK)
- Section
- Repairs
DoorsDoor - tail · page 2 of 2
- Remove 6 bolts securing tail door hinges to body and, with assistance, remove tail door. Glass - front or rear door
Refit
$% 76.31.01
- Support the tail door on a jack, using a block of wood to protect the door.
Remove
- With assistance position door. Fit securing bolts but do not tighten at this stage.
- Fit washer and spring clip securing check strap to aperture.
- Adjust position of tail door in relation to aperture, ensuring gaps around all 4 edges are consistent, and door closes cleanly onto dove tail.
- When tail door is correctly adjusted, tighten tail door hinge bolts to 34 Nm (25 lbf.ft).
- Feed harness and washer tube through outer edge of door and connect harness sleeve to door.
- Secure harness to tail door with clips.
- Connect washer tube to rear of wiper arm.
- Remove tape from draw string and secure to CHMSL wires.
- Draw wires through tail door and connect Lucars to CHMSL.
- Fit CHMSL cover and secure with screws.
- Connect multiplug of number plate lamp.
- Connect Lucars to HRW.
- Connect multiplug to rear wiper motor.
- Connect multiplug to door latch.
- Fit water shedder to door.
- Fit tail door trim casing. DOORS, REPAIRS, Trim casing - tail door.
- Fit spare wheel to tail door.
- Slide out and remove glass from frame.
- Remove door trim casing. DOORS, REPAIRS, Trim casing - front door. DOORS, REPAIRS, Trim casing - rear door.
- Carefully release water shedder from door.
- Front door glass only: Remove exterior door mirror. EXTERIOR FITTINGS, REPAIRS, Mirror - exterior - electric.
- Remove inner waist seal.
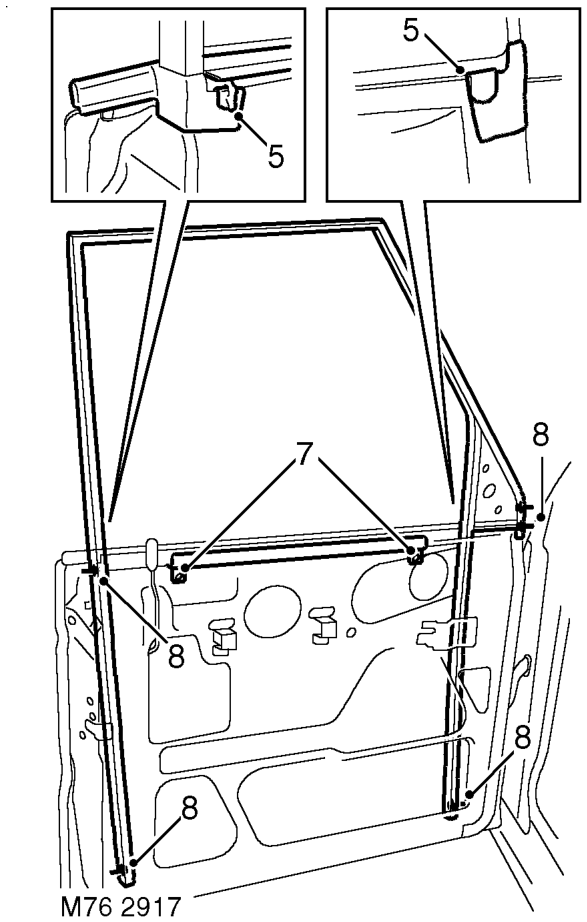
Front door shown, rear door similar
- Remove 2 clips securing ends of outer waist seal.
- Remove outer waist seal.
- Remove 2 bolts securing glass to regulator. If necessary, lower glass to access bolts.
- Remove bolts securing frame to door.
- Remove door frame complete with glass.
Parts & tools for this job For Land Rover Discovery
- TOOLTrim removal tool kitSearch: trim removal tool kit
- PARTTouch-up paintSearch: Land Rover touch up paint
- PARTPanel clip assortmentSearch: Land Rover panel clips assortment
Links open Amazon search results in a new tab. As an Amazon Associate I earn from qualifying purchases.