
Piston assemblies (page 3 of 3)
- Make
- Land Rover
- Model
- Discovery II (UK)
- Section
- Overhaul
Engine - V8Piston assemblies · page 3 of 3
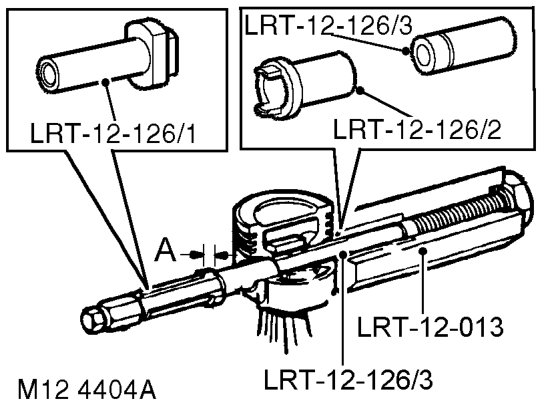
- Clamp hexagon body of tool LRT-12-013 in vice.
- Loosen large nut and pull the centre screw 50 mm (2 in) out of hexagon body.
- Fit piston adapter tool LRT-12-126/2 .
- Position guide pin tool LRT-12-126/3 in LRT- 12-162/2 with groove towards piston, up to shoulder on centre screw.
- Lubricate gudgeon pin and bores of connecting rod and piston with graphite oil.
- Locate connecting rod and piston to centre screw with connecting rod entered on sleeve up to groove.
- Fit gudgeon pin on to centre screw and into piston bore up to connecting rod.
- Fit remover/replacer tool LRT-12-126/1 with flanged end towards gudgeon pin.
- Screw the stop nut on to centre screw and position piston against groove of tool LRT-12- 126/3.
- Lubricate centre screw threads and thrust race with graphite oil, screw large nut up to tool LRT-12-013.
- Lock the stop nut securely with lock screw.
- Set torque wrench to 16 Nm (12 lbf.ft) and using socket on large nut, pull gudgeon pin in until flange of tool LRT-12-126/1 is 0.40 mm (0.016 in), dimension 'A' from face of piston. If torque is exceeded during this procedure, fit of gudgeon pin to connecting rod is not acceptable and components must be replaced.
CAUTION: The centre screw and thrust race must be kept well lubricated throughout the operation.
- Dismantle tool, remove piston and check no damage has occurred during pressing and that piston moves freely on gudgeon pin.
- Remove compression rings, oil control rails and expander from new piston.
- Invert piston and with arrow pointing towards rear of cylinder block, insert piston into cylinder liner.
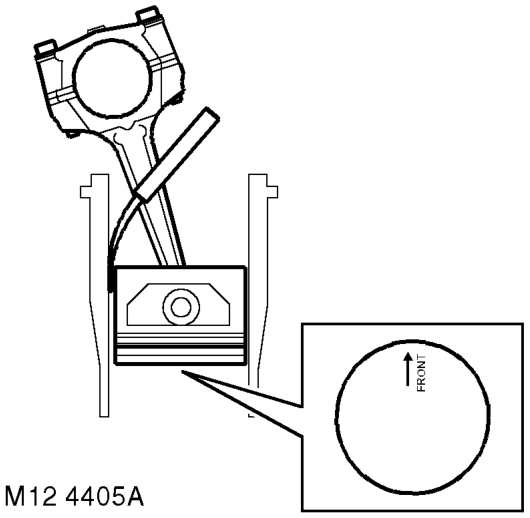
- Position piston with bottom of skirt 30 mm (1.12 in) from top cylinder liner.
- Using feeler gauges, measure and record clearance between piston and left hand side of cylinder- viewed from the front of cylinder block. l Piston to bore clearance = 0.020 to 0.045 mm (0.001 to 0.002 in).
- Insert piston rings into cylinder bore, use the piston to hold the rings square to bore and check the ring gap. l 1st compression ring = 0.30 to 0.50 mm (0.012 to 0.02 in). l 2nd compression ring = 0.40 to 0.65 mm (0.016 to 0.026 in). l Oil control ring rails = 0.38 to 1.40 mm (0.015 to 0.055 in).
- Remove piston rings from bore.
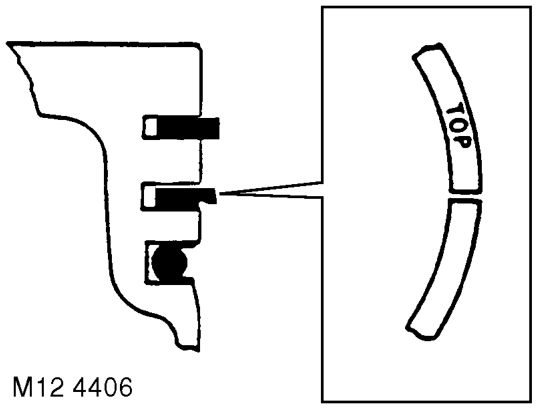
- Fit oil control ring rails and expander, ensuring ends butt and do not overlap.
Parts & tools for this job For Land Rover Discovery
- PARTEngine gasket setSearch: Land Rover Discovery engine gasket set
- TOOLTorque wrenchSearch: 3/8 inch torque wrench
- TOOLFeeler gauge setSearch: feeler gauge set
Links open Amazon search results in a new tab. As an Amazon Associate I earn from qualifying purchases.