
Panel - auxiliary switch
- Make
- Land Rover
- Model
- Discovery II (UK)
- Section
- Repairs › Panel - auxiliary switch
‹ Prev REPAIRS, Panel - fascia access - driver's side.Next › Panel - fascia access - driver's side Drink tray assembly - centre fascia
Interior trim componentsPanel - auxiliary switch
Panel - auxiliary switch
$% 76.46.38
Remove
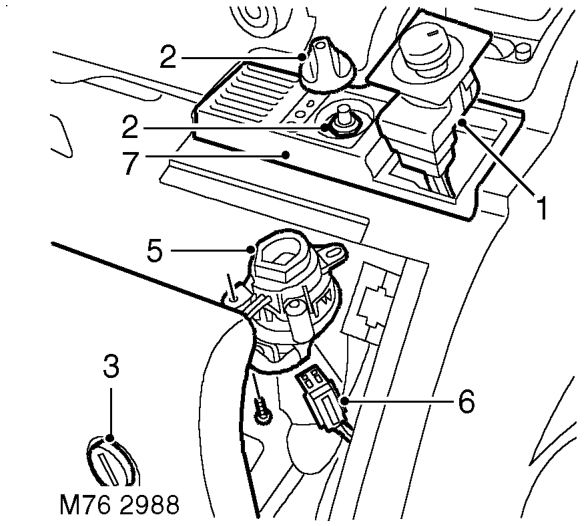
- Carefully remove electric exterior mirror switch from auxiliary switch panel and disconnect multiplug.
- Models with headlamp levelling: Release knob and remove nut securing headlamp levelling switch to auxiliary switch panel.
- Release 2 fasteners and open fascia access panel.
- Models with headlamp levelling: Remove headlamp levelling switch from auxiliary switch panel and disconnect multiplug.
- Models with A/C: Remove 2 screws securing in-car temperature sensor to auxiliary switch panel.
- Models with A/C: Disconnect multiplug from in-car temperature sensor and remove from auxiliary switch panel.
- Release 2 clips securing auxiliary switch panel to fascia and remove panel.
Refit
- Position auxiliary switch panel to fascia and clip into position.
- Models with A/C: Connect multiplug to in-car temperature sensor.
- Models with A/C: Position in-car temperature sensor to auxiliary switch panel and secure with screws.
- Models with headlamp levelling: Position headlamp levelling switch to auxiliary switch panel and secure with nut.
- Models with headlamp levelling: Replace cap and connect multiplug to headlamp levelling switch.
- Connect multiplug to exterior mirror switch and fit switch to auxiliary switch panel.
‹ Prev REPAIRS, Panel - fascia access - driver's side.Next › Panel - fascia access - driver's side Drink tray assembly - centre fascia
Parts & tools for this job For Land Rover Discovery
- TOOLOBD2 scannerSearch: OBD2 scanner
- TOOLDigital multimeterSearch: automotive digital multimeter
- TOOLBack-probe test leadsSearch: back probe test leads
Links open Amazon search results in a new tab. As an Amazon Associate I earn from qualifying purchases.