
Fascia
- Make
- Land Rover
- Model
- Discovery II (UK)
- Section
- Repairs › Fascia
Interior trim componentsFascia
- Remove console. NOTE: Do not carry out further dismantling if component is removed for access only.
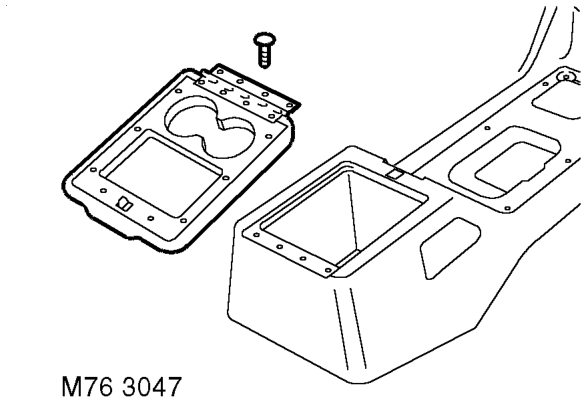
- Remove 4 screws securing storage bin lid to console and remove lid.
- Release cigar lighter body from console and remove.
Refit
- Fit and secure cigar lighter body to console.
- Fit lid to console and secure with screws.
- Fit console.
- Connect multiplug and bulb to cigar lighter.
- Fit centre console to fascia.
- Fit 2 bolts securing rear of console to transmission tunnel.
- Connect multiplugs to seat switches.
- Fit switches to console.
- Move handbrake to lowered position.
- Fit cable to handbrake and secure with clevis pin and clip.
- Fit handbrake gaiter to console.
- Fit bolts securing forward edge of console to transmission tunnel.
- Models with veneer trim: Position veneered console cover and connect multiplugs to switch pack. Fit cigar lighter element and secure veneered console cover to console.
- Models with base trim: Connect multiplugs to switch pack, fit switch pack to console and secure with screws.
- Models with base trim: Fit cover plate to switch pack, and rubber mat to console.
- Fit transfer gearbox gaiter and knob to lever.
- Secure gaiter to console.
- Fit knob and gaiter to gear lever and secure gear lever gaiter to console with clips.
- Models from 03MY:Fit both centre console cup holders.
Fascia
$% 76.46.23/99
Remove
- Remove the key from the starter switch. Disconnect both battery leads, negative lead first. Wait ten minutes before starting work.
- Remove radio cassette player. IN CAR ENTERTAINMENT, REPAIRS, Radio cassette player.
- Remove steering wheel. STEERING, REPAIRS, Steering wheel.
- Remove steering column nacelle. STEERING, REPAIRS, Nacelle - steering column.
- Remove centre console. l For models with automatic gearbox: INTERIOR TRIM COMPONENTS, REPAIRS, Console - centre - automatic models. l For models with manual gearbox: INTERIOR TRIM COMPONENTS, REPAIRS, Console - centre - manual models.
- Remove 'A' post trim panels.
Parts & tools for this job For Land Rover Discovery
- TOOLTrim removal tool kitSearch: trim removal tool kit
- PARTTouch-up paintSearch: Land Rover touch up paint
- PARTPanel clip assortmentSearch: Land Rover panel clips assortment
Links open Amazon search results in a new tab. As an Amazon Associate I earn from qualifying purchases.