
LHD models
- Make
- Rover
- Model
- 400 Workshop Manual
- Year
- 1995–2000
- Section
- Repairs › LHD models
BrakesLHD models
Do not carry out further dismantling if component is removed for access only.
- Remove mounting rubber assembly from each side of modulator and mounting rubber from underneath.
- Fit parts to new modulator.
Refit
- Engage spigot and fit modulator to mounting bracket and tighten mounting nuts to 21 Nm.
- Connect brake pipe unions to modulator, ensuring pipes are connected to their correct ports: MC 1 = Master cylinder primary MC 2 = Master cylinder secondary RF = Right hand front LF = Left hand front RR = Right hand rear LR = Left hand rear
- Tighten unions to 14 Nm.
- Connect multiplug to modulator and press clip in fully to secure.
LHD models
- Fit expansion tank to grommet, fit and tighten bolts.
All models
- Bleed brakes. See Adjustments.
- Connect battery earth lead.
- To ensure correct operation, the system MUST be tested using TestBook.
BRAKE PROPORTIONING VALVE - ABS 97.5MY ON
Service repair no - 70.25.15
Remove
- Position cloth to absorb fluid spillage.
CAUTION: Do not allow brake fluid to contact paint finished surfaces as paint may be damaged. If spilled, remove fluid and clean area with clean warm water.
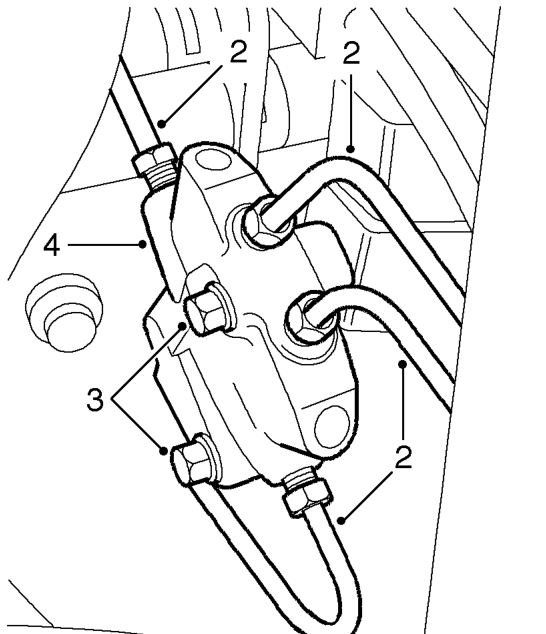
- Disconnect 4 brake pipes from valve.
CAUTION: Plug the connections.
- Remove 2 bolts securing valve to bracket.
- Remove brake proportioning valve.
Refit
- Position valve to bracket and tighten bolts to 10 Nm.
- Connect pipe unions to valve and tighten to 15 Nm.
- Remove cloth.
- Bleed brakes. See Adjustments.
Parts & tools for this job For 1995 Rover 400
- PARTBrake padsSearch: Rover 400 1995 brake pads
- TOOLBrake bleeder kitSearch: one man brake bleeder kit
- FLUIDBrake fluidSearch: brake fluid
Links open Amazon search results in a new tab. As an Amazon Associate I earn from qualifying purchases.