
Manual models
- Make
- Rover
- Model
- 400 Workshop Manual
- Year
- 1995–2000
- Section
- Repairs › Manual models
BrakesManual models
Refit
CAUTION: The domed nut on the push rod must not be adjusted. The servo gasket acts as a spacer, the correct gasket must be fitted.
- Fit gasket to servo.
- Fit servo to bulkhead, vacuum connection uppermost, tighten nuts to 13 Nm.
- Align push rod to brake pedal, fit clevis pin and secure with NEW spring clip.
- Grease clevis pin.
- Position universal joint cover and fit retaining clips and studs.
- Fit fascia lower cover, tighten screws and fit driver’s pocket.
Manual models
- Fit expansion tank to grommet and secure with bolts.
All models
- Connect brake vacuum hose and secure clip.
- Fit brake master cylinder. See this section.
BRAKE PROPORTIONING VALVE - ABS UP TO 97.5MY
Service repair no - 70.25.15
Remove
- Position cloth to absorb fluid spillage.
CAUTION: Do not allow brake fluid to contact paint finished surfaces as paint may be damaged. If spilled, remove fluid and clean area with clean warm water.
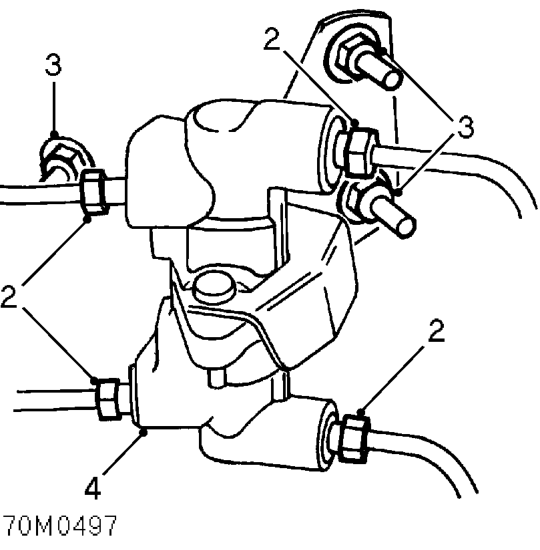
- Disconnect 4 brake pipes from valve.
CAUTION: Plug the connections.
- Remove 3 nuts securing valve bracket to bulkhead. Release harness clips from studs, where fitted
- Remove valve and bracket assembly.
CAUTION: Do not remove screws securing bracket to valve.
Refit
- Position valve and bracket assembly align pipes to valve and start unions
- Align valve bracket to body and tighten nuts to 10 Nm. Engage harness clips.
- Tighten pipe unions to 19 Nm.
- Remove cloth.
- Bleed brakes. See Adjustments.
Parts & tools for this job For 1995 Rover 400
- PARTBrake padsSearch: Rover 400 1995 brake pads
- TOOLBrake bleeder kitSearch: one man brake bleeder kit
- FLUIDBrake fluidSearch: brake fluid
Links open Amazon search results in a new tab. As an Amazon Associate I earn from qualifying purchases.