
ABS ECU - up to 97.5my
- Make
- Rover
- Model
- 400 Workshop Manual
- Year
- 1995–2000
- Section
- Repairs › ABS ECU - up to 97.5my
BrakesABS ECU - up to 97.5my
Refit
- Clean sensor and hub adaptor mating surfaces.
- Fit sensor to adaptor, fit Torx screw and tighten to 6 Nm.
- Fit sensor cover, fit bolts and tighten to 10 Nm.
- Align harness bracket to sensor cover, fit bolt and tighten to 10 Nm.
- Align harness brackets to hub, lower arm and body, fit bolts and tighten to 10 Nm.
- Ensure ’O’ ring is in place and connect sensor multiplug to body harness. Secure multiplug in clip.
- Fit road wheel(s) and tighten nuts to correct torque. See INFORMATION, Torque wrench settings.
- Remove stand(s) and lower vehicle.
- To ensure correct operation, the system MUST be tested using TestBook.
ABS ECU - UP TO 97.5MY
Service repair no - 70.25.34
Remove
- Disconnect battery earth lead.
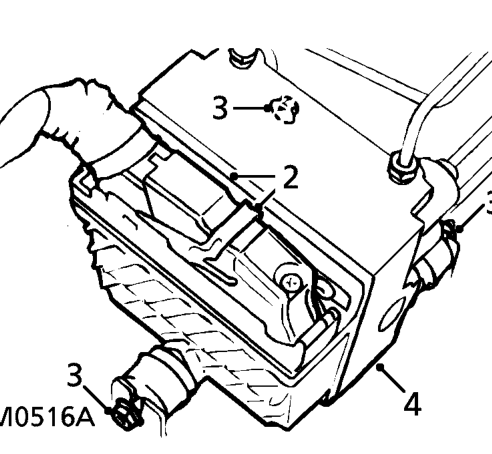
- Lift clip and disconnect multiplug from ABS ECU.
- Loosen 3 nuts securing ABS modulator and ECU assembly to mounting bracket.
- Release ABS modulator and ECU from bracket.
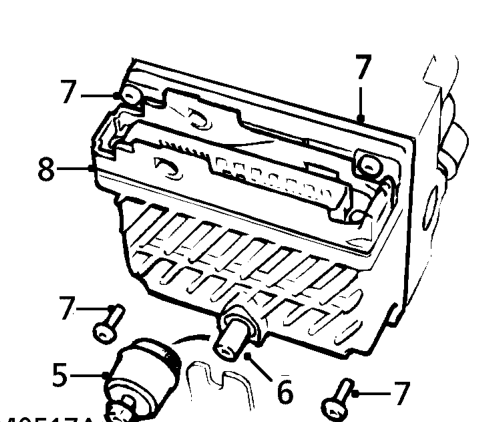
- Remove rubber mounting from spigot on ECU.
- Remove mounting spigot from ECU using a TX30 adaptor.
- Remove 4 TX25 screws securing ECU to modulator.
- Remove ECU from modulator.
CAUTION: Take great care to prevent the entry of foreign matter into the rear of the modulator.
Parts & tools for this job For 1995 Rover 400
- TOOLOBD2 scanner with ABSSearch: OBD2 scanner ABS SRS
- TOOLDigital multimeterSearch: automotive digital multimeter
Links open Amazon search results in a new tab. As an Amazon Associate I earn from qualifying purchases.