
Rotary coupler
- Make
- Rover
- Model
- 800 Workshop Manual
- Year
- 1996–1999
- Section
- Repairs › Rotary coupler
Restraint systemsRotary coupler · page 1 of 3
Refit
- Fit warning light bulbs.
- Carefully fit warning light housing, ensuring that locating pegs engage correctly and that retaining clips lock housing into position.
- Align tachometer face plate ensuring tachometer needle is on the correct side of its stop.
- Fit and tighten face plate screws.
- Fit tachometer and fit and tighten screws.
- Position ECU, connect multiplug, fit cover and fit and tighten screws.
- Fit face plate.
- Fit trip button.
- Position lamp assembly to window casing.
- Secure wiring into clip.
- Fit and tighten screw.
- Clean window making sure glass is clean.
- Position window to panel.
- Secure window tags.
- Fit bulb holder in back of panel.
- Fit instrument panel. See INSTRUMENTS, Repairs.
- Check SRS system using TestBook.
ROTARY COUPLER
Service repair no - 86.65.85
WARNING: The following warnings must be observed:
• DO NOT disassemble the rotary coupler, it has no serviceable parts and must be replaced as a complete assembly. • Replace the rotary coupler every 10 years. • The rotary coupler is a special part for use with SRS. When replacing, be sure to use only a genuine Rover part. • Make sure the wheels are aligned straight ahead.
Remove
- Remove key from starter switch.
CAUTION: Wait 10 minutes to allow SRS back-up power circuit to discharge before commencing work.
- Disconnect both battery leads, earth lead first.
- Remove steering wheel. See STEERING, Repairs.
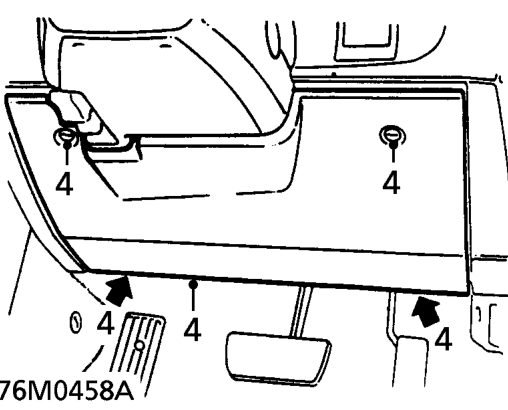
- Release 4 turnbuckles securing fuse box cover and remove cover.
Parts & tools for this job For 1996 Rover 800
- TOOLOBD2 scanner with SRSSearch: OBD2 scanner ABS SRS
- TOOLTrim removal tool kitSearch: trim removal tool kit
Links open Amazon search results in a new tab. As an Amazon Associate I earn from qualifying purchases.