
Sensor - engine coolant temperature (ECT) (page 2 of 2)
- Make
- Land Rover
- Model
- Discovery II (UK)
- Section
- Repairs
Engine management system - V8Sensor - engine coolant temperature (ECT) · page 2 of 2
- Disconnect multiplug from ECT sensor.
- Remove sensor from inlet manifold and discard Sensor - crankshaft position (CKP) sealing washer. $% 18.30.12
Refit
- Clean sealant from threads in manifold.
Remove
- Apply Loctite 577 to sensor threads.
- Fit new sealing washer to ECT sensor and tighten sensor to 10 Nm (7 lbf.ft).
- Connect multiplug to ECT sensor.
- Position alternator, fit bolts and tighten to 45 Nm (33 lbf.ft).
- Fit auxiliary drive belt. CHARGING AND STARTING, REPAIRS, Belt - auxiliary drive.
- Top up cooling system.
- Connect battery earth lead.
- Fit battery cover and secure with fixings.
Refit
- Release fixings and remove battery cover.
- Disconnect battery earth lead.
- Raise front of vehicle.
WARNING: Do not work on or under a vehicle supported only by a jack. Always support the vehicle on safety stands.
4. Release fixings and remove underbelly panel.
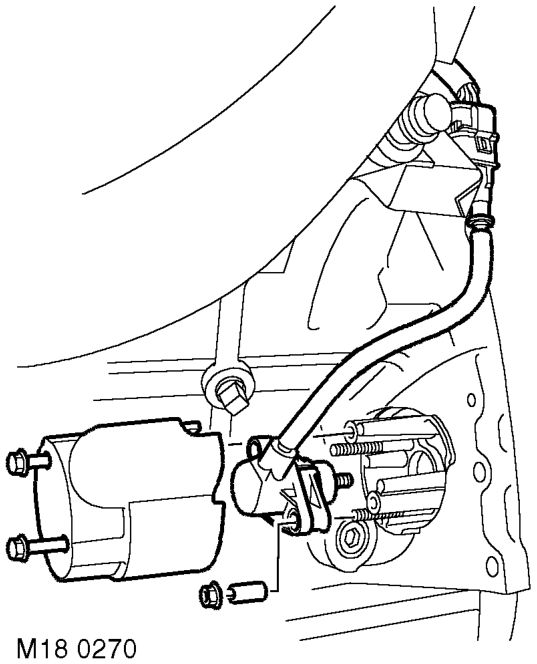
- Release CKP sensor multiplug from bracket.
- Remove 2 bolts securing CKP sensor heat shield and position aside.
- Remove 2 nuts securing CKP sensor, remove 2 spacers, CKP sensor and sensor mounting.
- Disconnect CKP sensor multiplug from engine harness.
- Ensure all components are clean.
- Connect CKP sensor multiplug to engine harness.
- Fit sensor mounting, CKP sensor, 2 spacers and tighten CKP sensor retaining nuts to 6 Nm (5 lbf.ft).
Parts & tools for this job For Land Rover Discovery
- TOOLOBD2 scannerSearch: OBD2 scanner
- TOOLDigital multimeterSearch: automotive digital multimeter
- TOOLBack-probe test leadsSearch: back probe test leads
Links open Amazon search results in a new tab. As an Amazon Associate I earn from qualifying purchases.