
Rear floor (RH/LH section) Roof assembly
- Make
- Land Rover
- Model
- Discovery II (UK)
- Section
- Repairs › Rear floor (RH/LH section) Roof assembly
Panel repairsRear floor (RH/LH section) Roof assembly
Rear floor (RH/LH section) Roof assembly
In this procedure, the cross member rear assembly, Remove cross member outer rear panel (RH/LH section), cross member closing rear panel, 'E' post assembly, 'E' post closing assembly and the panel body side assembly are replaced in conjunction with the rear floor (RH/LH section).
Remove
- Disconnect both battery leads, negative lead first.
- Disconnect leads/multiplug from alternator.
- Remove cross member rear assembly. PANEL REPAIRS, REPAIRS, Cross member rear assembly.
- Remove mud flap mounting brackets.
- LH side: Remove exhaust heatshield from rear floor.
Repair
- Remove roof bars, if fitted.
- Remove tread plates from front door apertures.
- Remove 'A' post lower trim panels.
- Remove front door aperture seals.
- Remove tread plates from rear door apertures.
- Remove rear door aperture seals.
- Remove 'D' post outer trim finisher.
- Remove windscreen.
- Remove alpine light glass.
- Remove side and rear drip rail finishers.
- Remove existing panel(s), prepare panel joint
- Release relevant wiring and position aside.
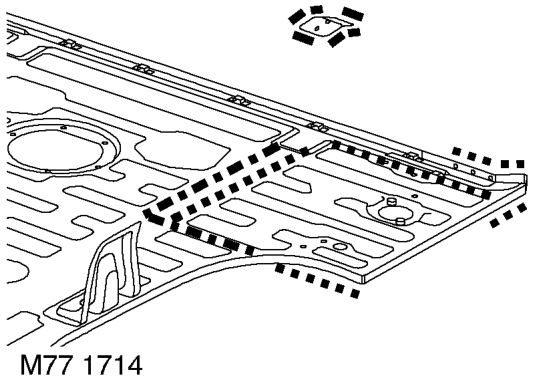
faces and install new panel(s) in accordance with Panel Replacement Procedure. Punch or drill holes in new panel for plug welding as shown.
Refit
- LH side: Fit exhaust heatshield to rear floor.
- Fit mud flap mounting brackets.
- Fit cross member rear assembly. PANEL REPAIRS, REPAIRS, Cross member rear assembly.
- Connect leads/multiplug to alternator.
- Connect battery leads, negative lead last.
- Disconnect both battery leads, negative lead first.
- Disconnect leads/multiplug from alternator.
- Models with sunroof: Remove front sunroof. SUNROOF, REPAIRS, Sunroof - front.
- Models with sunroof: Remove rear sunroof. SUNROOF, REPAIRS, Sunroof - rear.
- Models with sunroof: Release sunroof drain tubes and position aside.
6. Models with fixed roof: Remove head lining. INTERIOR TRIM COMPONENTS, REPAIRS, Headlining.
- Remove front seats. SEATS, REPAIRS, Seat - front.
- Remove rear seats. SEATS, REPAIRS, Seat - rear.
- Remove rear headrests, if fitted.
Parts & tools for this job For Land Rover Discovery
- TOOLTorque wrenchSearch: 3/8 inch torque wrench
- TOOLSocket setSearch: socket set metric
- BOOKHaynes manualSearch: Haynes manual Land Rover Discovery
Links open Amazon search results in a new tab. As an Amazon Associate I earn from qualifying purchases.