
Models with air conditioning (page 3 of 3)
- Make
- Rover
- Model
- 400 Workshop Manual
- Year
- 1995–2000
- Section
- Repairs
Engine - L SeriesModels with air conditioning · page 3 of 3
Refit
- Clean sump and cylinder block mating faces. Ensure bolt holes in cylinder block are clean and dry.
- Fit a new gasket to sump.
- Remove all traces of sealant from rear oil seal housing, rear main bearing cap, cylinder block and front main bearing cap using suitable solvent.
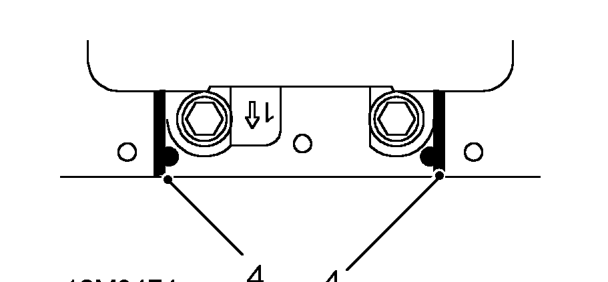
- Using sealant from kit Part No. GUG 705963GM, fill grooves on each side of front main bearing cap and along joint lines of bearing cap and cylinder block.
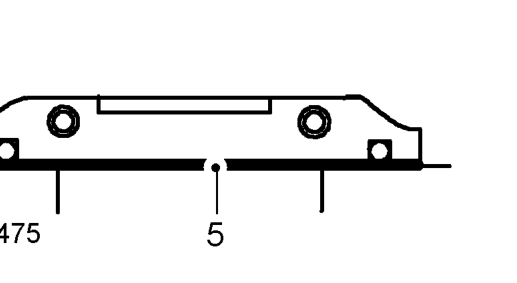
- Apply a 1 mm thick bead of sealant from kit to joint line of crankshaft rear oil seal housing, rear main bearing cap and cylinder block.
CAUTION: Do not apply sealant until immediately prior to fitting sump. Do not spread sealant bead.
- Fit sump, fit and finger tighten 17 bolts.
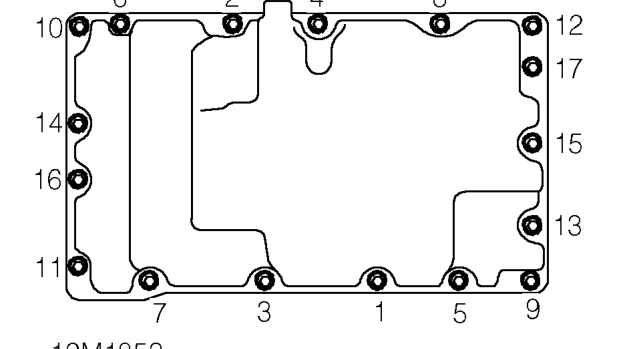
- Tighten bolts in sequence shown to 25 Nm.
- Using same sequence, check that all bolts are tightened to 25 Nm.
- Fit 2 bolts securing oil cooler pipe clips to sump.
- Clean oil cooler pipe union.
- Fit new ’O’ ring to pipe.
- Connect pipe to oil pump and tighten union nut to 25 Nm.
- Fit bolt securing oil cooler pipe clip to coolant pump mounting.
- Connect vacuum return pipe to sump.
- Fit support bracket and tighten bolts, bracket to adaptor plate to 70 Nm and bolt bracket to sump to 25 Nm.
- Fit 2 bolts securing PAS pipe to sump and engine to gearbox support bracket.
- Align lower tie rod to bracket on sump and tighten bolts to 80 Nm.
- Fit oil filter. See this section.
- Fill with engine oil. See MAINTENANCE.
- Fit underbelly panel. See BODY, Exterior fittings.
- Remove stand(s) and lower vehicle.
Parts & tools for this job For 1995 Rover 400
- TOOLA/C manifold gauge setSearch: AC manifold gauge set
- TOOLUV leak detection kitSearch: AC UV leak detection kit
- PARTCabin filterSearch: Rover 400 1995 cabin filter
Links open Amazon search results in a new tab. As an Amazon Associate I earn from qualifying purchases.