
Supplemental Restraint System (SRS)
- Make
- Rover
- Model
- 600 Rover 600 Repair Manual - Volumes 1 and 2 - 2nd Edition
- Section
- Exterior fittings › Supplemental Restraint System (SRS)
BodySupplemental Restraint System (SRS)
Supplemental Restraint System (SRS)
The SRS wiring harnesses are routed near the dash board and steering column.
CAUTION:
- All the SRS electrical wiring harnesses are covered with a yellow outer insulation.
- Replace the entire affected SRS wiring harness assembly if it has an open circuit or damaged wiring.
- Before disconnecting the SRS wiring harnesses, turn the ignition switch off, disconnect the negative and positive battery cables, and wait at least three minutes.
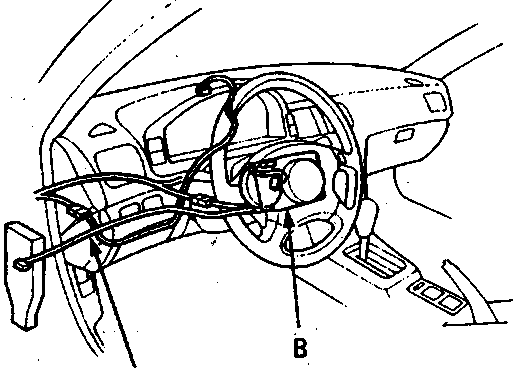
- A SRS main harness
- B Airbag assembly
Equipment
Note: Removal and installation of a windscreen requires the following equipment.
Windscreen repair kit (BHM 705) comprising of:
- P.U adhesive cartridge
- Spirit wipe
- Body primer
- Glass primer
- Cotton bud applicators
- Cutting (piano) wire
- 2 Lower (L shaped) spacers.
- 7 Spacer blocks.
- Sealer applicator gun.
- Suction cup lifters.
- Sharp knife (to trim off old bonding material).
- Awl (to make a hole through existing adhesive for cutting wire).
- Leak test equipment.
- Masking tape.
WARNING: When working with solvents and primers use PVC gloves and protective clothing. Always use protective gloves when handling glass.
Broken windscreen replacement
Remove as many broken windscreen fragments as possible with a vacuum cleaner.
Blow out any glass in the heater and behind the dashboard with low pressure compressed air.
WARNING: Wear eye protection while using the air gun.
- Set the temperature control dial to cold.
- Select the feet/floor mode on the control dial.
- Make sure the recirculation button is off.
- Blow compressed air through the defroster centre vent.
- Remove blower duct, and remove any glass from the air mix chamber.
- Remove any glass from the top of the vent/defroster door.
- Remove any glass from the top and bottom of the carpets and seats.
Parts & tools for this job For Rover 600
- TOOLOBD2 scanner with SRSSearch: OBD2 scanner ABS SRS
- TOOLTrim removal tool kitSearch: trim removal tool kit
Links open Amazon search results in a new tab. As an Amazon Associate I earn from qualifying purchases.