
Front headlining - hard top
- Make
- Land Rover
- Model
- Defender 90 Workshop Manual (NAS)
- Section
- Repair › Front headlining - hard top
Chassis and bodyFront headlining - hard top
FRONT HEADLINING - HARD TOP
Service repair no - 76.64.10
Remove
- Remove sun roof headlining finisher.
- Remove sun visors. See Sun visors 10. Lower headlining, disconnect interior lamp
- Remove interior lamp. See ELECTRICAL, Repair, Interior lamp
- Remove 4 retaining screws and detach both ’A’ post trims.
- Remove caps and unscrew front seat belt fixing bolts from ’B/C’ posts.
- Carefully prise side trim panel cap fastener from 11. Do not carry out further dismantling if ’B/C’ posts.
- Remove interior lamp harness from headlining.
- Carefully prise 2 cap fasteners, from each side, securing headlining to body at door apertures.
- Carefully prise out 7 cap fasteners securing front and rear headlinings to roof.
- From both sides, pull side trim panel inwards enough to release rear corners of front headlining.
harness plug at ’A’ post, and remove headlining from vehicle.
NOTE: Take care not to bend the headlining on removal and refitting.
component is removed for access only.
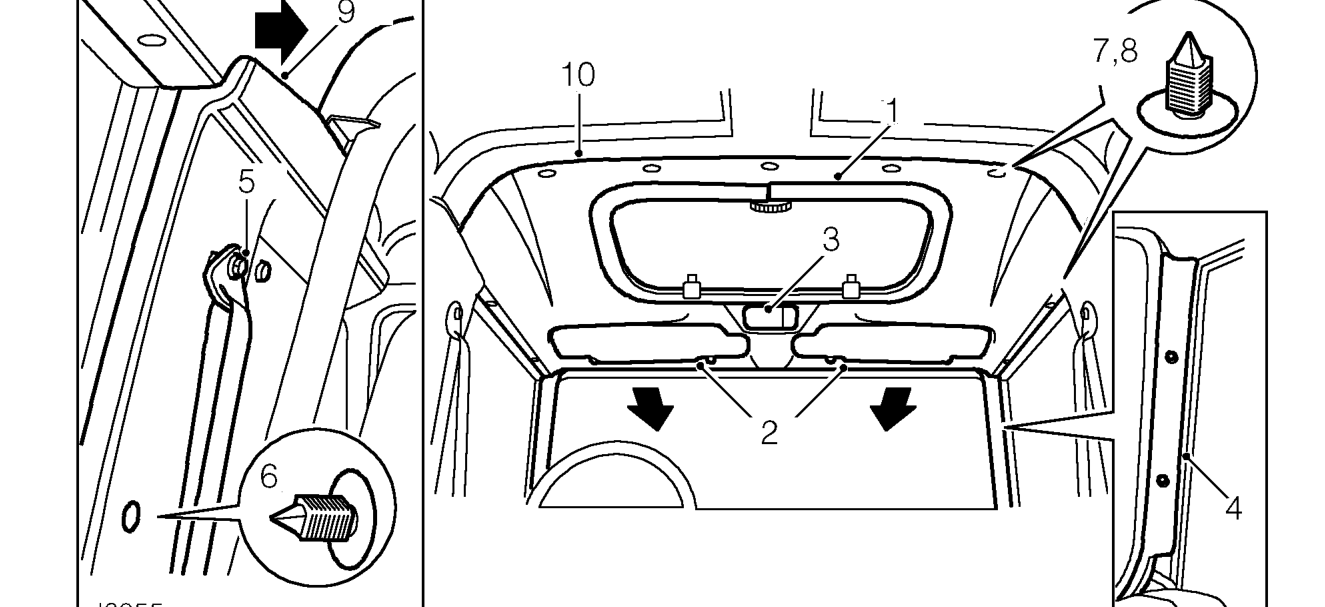
Refit
- Tape interior lamp harness to headlining. 18. Fit side cap fasteners at ’B/C’ posts.
- With assistance, raise headlining to roof. 19. Secure seat belts to ’B/C’ posts and tighten bolts
- Carefully pull side trim panel inwards, on both sides, and slide headlining behind trim panel. 20. Fit ’A’ post trims.
- Position front headlining into recess of rear 21. Fit interior lamp. headlining and secure both to roof mounting brackets with cap fasteners. 22. Fit sun visors.
- Secure both sides of front headlining to body at 23. Fit sun roof headlining finisher. door apertures with cap fasteners.
to 32 Nm, 24 lbf ft.
Fit caps to bolts.
- See ELECTRICAL, Repair,
- Interior lamp
- See Sun visors
Parts & tools for this job For Land Rover Defender
- TOOLTrim removal tool kitSearch: trim removal tool kit
- PARTTouch-up paintSearch: Land Rover touch up paint
- PARTPanel clip assortmentSearch: Land Rover panel clips assortment
Links open Amazon search results in a new tab. As an Amazon Associate I earn from qualifying purchases.