
Gasket - cylinder head (page 4 of 5)
- Make
- Land Rover
- Model
- Discovery II (UK)
- Section
- Repairs
Engine - Td5Gasket - cylinder head · page 4 of 5
Refit
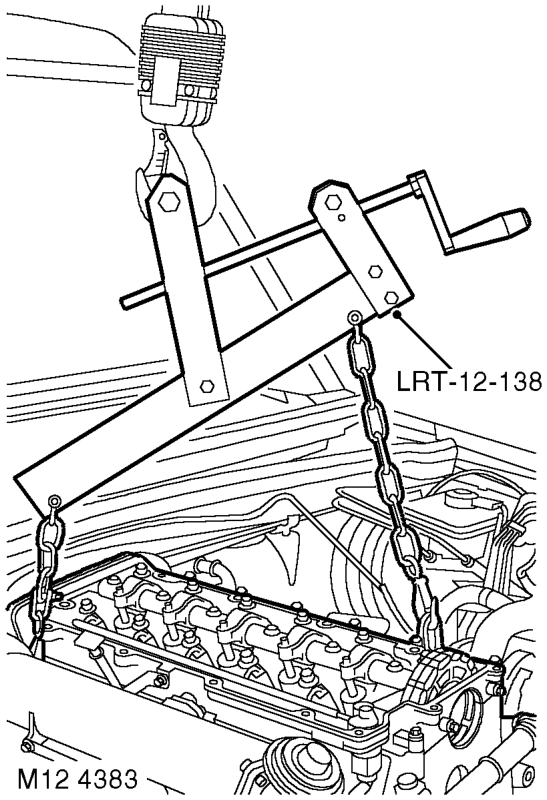
- Using suitable lifting chains and tool LRT-12- 138 carefully remove cylinder head and place on wooden blocks or stands.
CAUTION: Support both ends of cylinder head on blocks of wood. With the camshaft carrier bolted down, the injector nozzles and some of the valves will protrude from the face of the cylinder head.
- Remove cylinder head gasket.
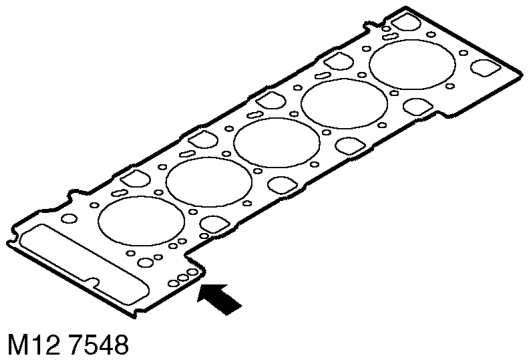
- Note the gasket thickness indicator and ensure the same thickness gasket is used on refitment of cylinder head.
- Remove and discard plastic dowels from 10. Fit nut and bolt securing cylinder head to timing cylinder block.
- Clean mating faces of cylinder head and cylinder block.
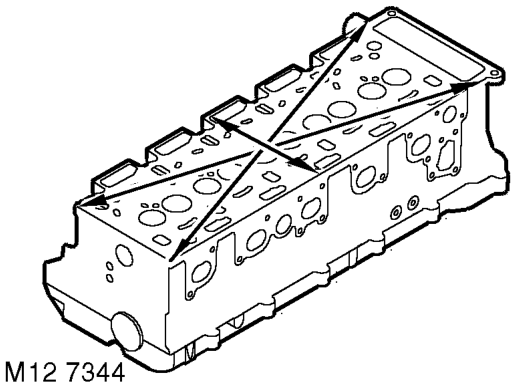
- Check cylinder head for warping, across centre and from corner to corner: – Maximum warp = 0.10 mm (0.0004 in)
CAUTION: Cylinder heads may not be refaced, replace cylinder head if warping exceeds figure given.
- Ensure coolant and oil passages are clean.
- Clean dowel holes and fit new plastic dowels.
- Lightly lubricate threads and beneath heads of cylinder head bolts with clean engine oil.
- Fit new cylinder head gasket of the correct thickness with the word 'TOP' uppermost.
- Using assistance, fit cylinder head and locate onto dowels.
- Carefully enter cylinder head bolts, DO NOT DROP. Lightly tighten bolts.
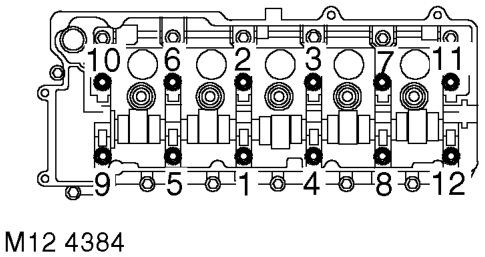
- Using the sequence shown, progressively tighten cylinder head bolts to 30 Nm (22 lbf.ft), then to 65 Nm (48 lbf.ft), then a further 90°, then a further 180° and finally a further 45°.
CAUTION: Ensure correct sequence is followed for all 5 tightening stages. Do not tighten bolts 315 degrees in one operation.
chain cover and tighten to 25 Nm (18 lbf.ft).
Parts & tools for this job For Land Rover Discovery
- PARTEngine gasket setSearch: Land Rover Discovery engine gasket set
- TOOLTorque wrenchSearch: 3/8 inch torque wrench
- TOOLFeeler gauge setSearch: feeler gauge set
Links open Amazon search results in a new tab. As an Amazon Associate I earn from qualifying purchases.