
Hood outer cover
- Make
- Land Rover
- Model
- Freelander Service Procedures
- Section
- REPAIRS › Hood outer cover
HOOD
76-7-4
REPAIRS
Hood outer cover
$% 76.61.11
Always position trim components on a soft
covered, clean work surface.
Where necessary, transfer witness marks from the
old cover to aid assembly. New outer covers are
supplied complete with the header rail.
The following operation involves the bonding of
fabric backed vinyl. If adhesive is to be applied to the
fabric backing, Dunlop 758 adhesive or equivalant
should be used. For direct application on vinyl
surfaces, use Dunlop S1588 adhesive or equivalant.
A thin coating of adhesive should be applied to both
surfaces and then allowed to cure, until touch dry, for
between 5 and 10 mins before bond is made.
Remove
1. Remove soft-back assembly.
HOOD, REPAIRS, Hard top - remove
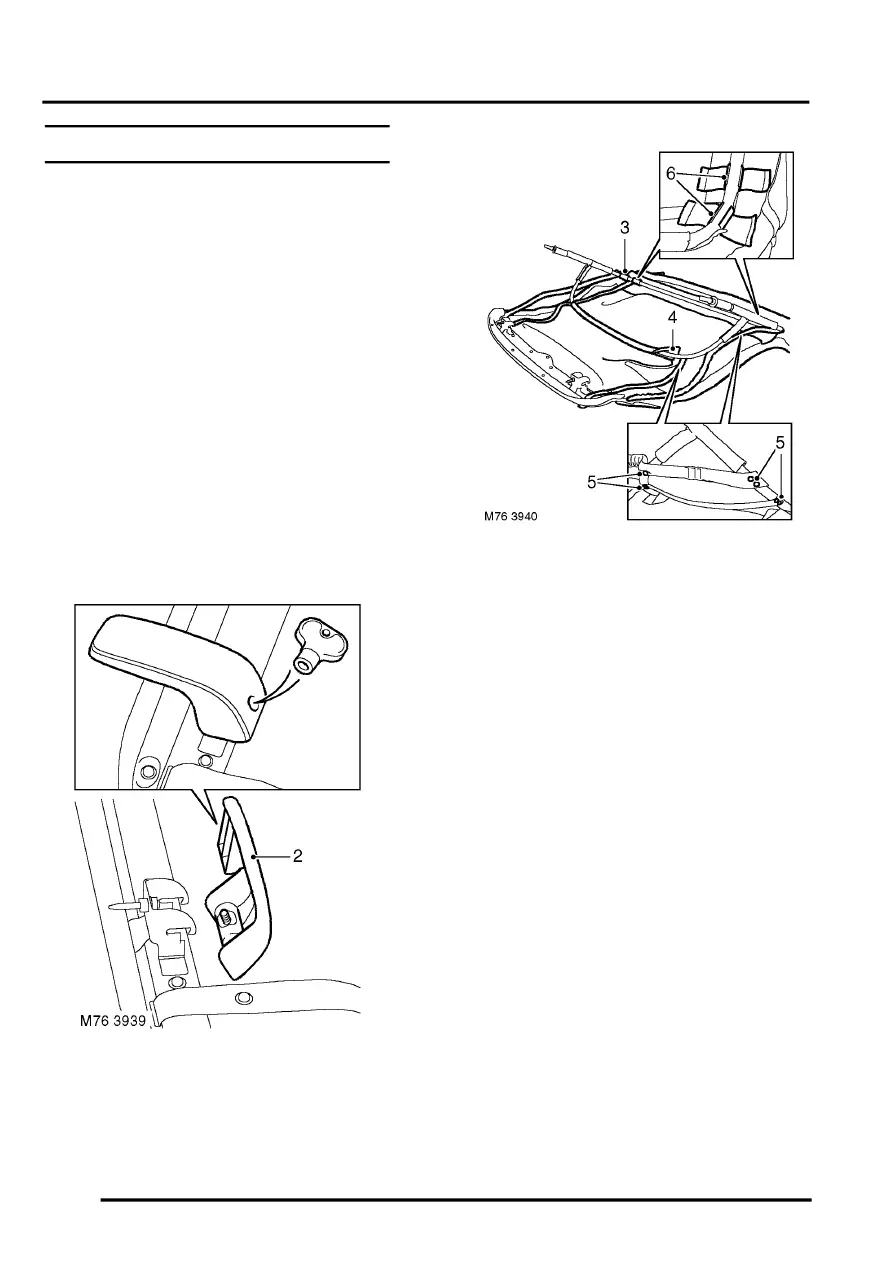
2. Loosen catch screws with special key, release
catches from hood and remove both catches.
3. Release fabric flaps from rear of frame.
4. Release fabric flap from front of frame.
5. Remove 14 screws securing tension straps
6. Release frame from outer cover retainers.
7. Remove frame from outer cover.
Refit
1. Clean excess adhesive from frame using a
suitable solvent.
2. Position frame to hood outer cover and locate
in retainers.
3. Position tension straps and secure with screws.
4. Apply adhesive to fabric flap and secure to front
of frame.
5. Apply adhesive to fabric flaps and secure to
rear of frame.
Ensure adhesive does not contact frame.
The fabric flaps should be free to move on the
frame.
6. Fit hood catches and secure with special key.
7. Fit soft back assembly.
Parts & tools for this job For Land Rover Freelander
- TOOLTorque wrenchSearch: 3/8 inch torque wrench
- TOOLSocket setSearch: socket set metric
- BOOKHaynes manualSearch: Haynes manual Land Rover Freelander
Links open Amazon search results in a new tab. As an Amazon Associate I earn from qualifying purchases.