
Engines fitted with manual timing belt tensioner
- Make
- Rover
- Model
- 200 Workshop Manual
- Year
- 1995–1999
- Section
- Repairs › Engines fitted with manual timing belt tensioner
Engine - K16Engines fitted with manual timing belt tensioner
- Connect fuel outlet pipe to fuel filter and tighten union to 28 Nm.
- Connect multiplug to IACV.
- Connect HO2S multiplug to engine harness and secure to clip on bracket.
- Secure coil h.t. lead to clip on bracket and connect to distributor cap.
- Connect multiplug to IAT sensor.
- Connect multiplug to injector harness.
- Connect multiplug to TP sensor.
- Connect multiplugs to ECT sensors.
- Connect coolant hose to coolant outlet elbow and tighten clip.
- Connect radiator top hose to coolant outlet elbow and tighten clip.
- Fit new gasket to exhaust manifold flange and connect exhaust front pipe.
- Fit 4 nuts securing exhaust front pipe to exhaust manifold and tighten to 45 Nm.
- Fit alternator top mounting bracket to stud on cylinder head.
- Connect alternator heatshield to stud on cylinder head.
- Fit and tighten bolt securing alternator heatshield to mounting bracket.
- Position alternator in vehicle.
- Connect 2 cables to alternator and secure with nuts.
- Fit bolt securing alternator top mounting bracket to cylinder head and tighten to 25 Nm.
- Fit nut securing alternator top mounting bracket to cylinder head and tighten to 25 Nm.
- Manoeuvre alternator onto mounting brackets.
- Fit 2 through bolts securing alternator to mounting brackets, fit 2 nuts and tighten to 45 Nm.
- Fit camshaft timing belt rear cover to cylinder head and cylinder block.
- Fit 4 bolts securing camshaft timing belt rear cover to cylinder head and cylinder block and tighten bolts to 10 Nm.
- Fit 2 camshaft gears to their respective camshafts.
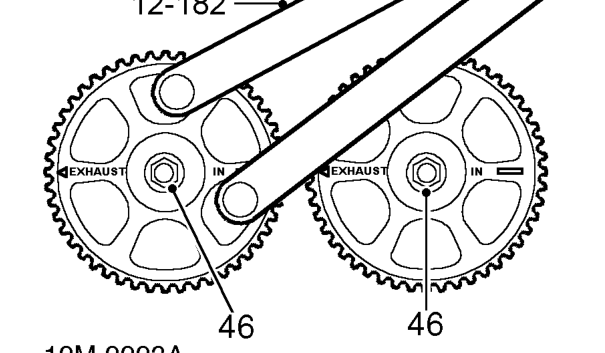
- Fit bolts and washers securing camshaft gears to camshafts. Using tool 12-182 restrain camshaft gears and tighten bolts to: M8 Bolts - 35 Nm M10 Bolts - 65 Nm
- Using tool 12-182 align camshaft gear timing marks and fit tool 18G 1570 to camshaft gears.
Engines fitted with manual timing belt tensioner
- Fit camshaft timing belt tensioner to cylinder head.
- Fit tensioner pulley Allen bolt.
- Connect tensioner spring to tensioner and to stud on cylinder head.
- Push tensioner pulley down to fully OFF position, fit and tighten backplate bolt to 10 Nm.
All engines
- Fit new camshaft timing belt. See this section.
- Remove stand(s) and lower vehicle.
- Refill cooling system. See COOLING SYSTEM - ’K’ SERIES, Adjustments.
- Connect battery earth lead.
- Adjust throttle cable. See ENGINE MANAGEMENT SYSTEM - MEMS, Adjustments.
Parts & tools for this job For 1995 Rover 200
- PARTTiming belt kitSearch: Rover 200 1995 timing belt kit
- TOOLEngine timing tool setSearch: Rover engine timing tool set
- TOOLTorque wrenchSearch: 3/8 inch torque wrench
Links open Amazon search results in a new tab. As an Amazon Associate I earn from qualifying purchases.