
All Models (page 5 of 5)
- Make
- Rover
- Model
- 400 Workshop Manual
- Year
- 1995–2000
- Section
- Repairs
Engine - L SeriesAll Models · page 5 of 5
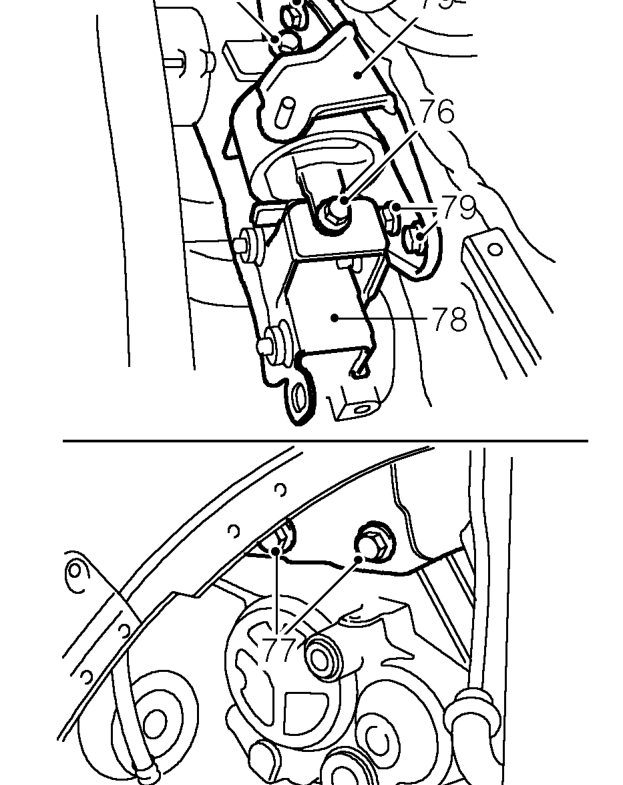
- Remove 2 bolts securing LH engine mounting to bracket on gearbox.
- Lower engine and gearbox assembly for access and remove 2 bolts securing mounting bracket to gearbox.
- Remove bracket from gearbox.
- Remove 4 bolts securing LH engine mounting to body and remove mounting.
- Using adjustable lifting bracket tool 18G 1598, tilt engine with the gearbox as low as possible.
- Using assistance, raise engine and manoeuvre from vehicle.
- Move engine and gearbox away from vehicle and lower. Disconnect hoist from adjustable lifting bracket.
Refit
- Connect hoist to adjustable lifting bracket tool 18G 1598.
- Using assistance, raise engine and manoeuvre into position in vehicle.
- Adjust lifting bracket tool so engine is horizontal in engine compartment.
- Fit LH engine mounting to body and tighten bolts to 45 Nm.
- Fit mounting bracket to gearbox and tighten bolts to 60 Nm.
- Raise unit to align LH mounting to bracket on gearbox and tighten bolts to 45 Nm.
- Fit engine mounting bracket to mounting, fit special washer and start but do not tighten nut.
- Align engine to mounting bracket and engage dowels.
- Fit bolts securing mounting bracket to engine and tighten to 105 Nm.
- Fit nut securing bracket to engine mounting and tighten to 80 Nm.
- Fit tie bar to RH engine mounting and align to body.
- Fit through bolts securing tie bar to body and engine mounting, DO NOT tighten bolts.
- Lower hoist and disconnect adjustable lifting bracket tool 18G 1598 from engine lifting bracket.
- Fit fuel filter into its bracket.
- Align lower steady bar to bracket on engine.
- Fit bolt steady bar to bracket on engine tighten both steady bar bolts to 80 Nm.
- Connect selector rod to selector shaft and align holes.
- Fit new roll pin securing selector rod to shaft and fit roll pin retaining clip.
- Fit washers to gear change steady bar and connect steady bar to gearbox.
- Fit bolt securing steady bar to gearbox and tighten to 10 Nm.
- Connect LH drive shaft to gearbox, as detailed in LH differential oil seal. See MANUAL GEARBOX - ’PG1’, Repairs.
- Connect RH drive shaft to gearbox, as detailed in RH differential oil seal. See MANUAL GEARBOX - ’PG1’, Repairs.
Parts & tools for this job For 1995 Rover 400
- PARTEngine gasket setSearch: Rover 400 1995 engine gasket set
- TOOLTorque wrenchSearch: 3/8 inch torque wrench
- TOOLFeeler gauge setSearch: feeler gauge set
Links open Amazon search results in a new tab. As an Amazon Associate I earn from qualifying purchases.