
Cylinder head - inspection (page 2 of 2)
- Make
- Rover
- Model
- 200 Workshop Manual
- Year
- 1995–1999
- Section
- Repairs
Engine - L SeriesCylinder head - inspection · page 2 of 2
- Temporarily fit crankshaft pulley bolt, remove timing pin 18G 1523 and using crankshaft pulley bolt, rotate crankshaft anti-clockwise until numbers 1 and 4 pistons are approximately 25 mm below cylinder block top face. Do not remove bolt at this stage.
CAUTION: Ensure timing belt is not trapped as crankshaft is rotated.
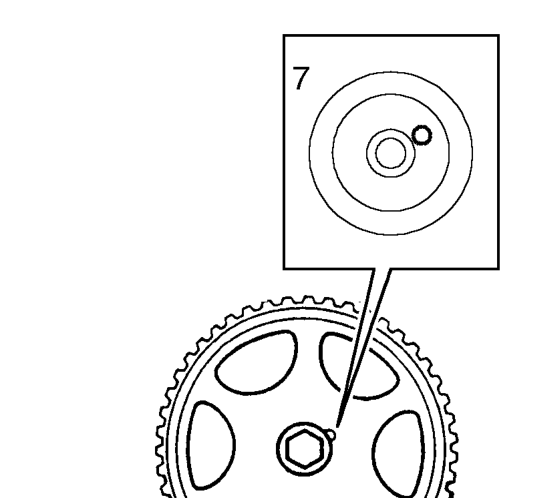
- Check that camshaft timing gear drive pin is at 2 o’clock position. If necessary, temporarily fit camshaft gear and rotate camshaft until pin is positioned. Remove timing gear.
- Apply a light film of engine oil to cylinder head bolt threads and underside of bolt heads.
CAUTION: Do not lubricate underside of washers.
- Fit location dowels to cylinder block.
- Fit new cylinder head gasket to block, dry.
- Using assistance, fit cylinder head onto block, carefully locating on dowels.
- Fit cylinder head bolts in their original fitted order, do not drop bolts into cylinder block.
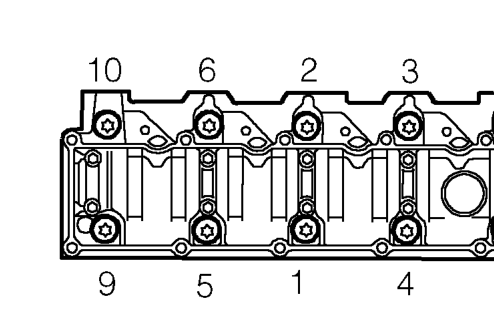
- Tighten cylinder head bolts progressively in the sequence shown, using the following procedure: i.Tighten all bolts to 30 Nm. ii.Tighten all bolts to 65 Nm. Using a felt tip pen, mark position of radial mark on each bolt head. iii.Turn all bolts through 90° . iv.Turn all bolts through another 90° .
CAUTION: Ensure correct sequence is followed for all 4 tightening stages. Do not tighten bolts 180° in one operation.
Parts & tools for this job For 1995 Rover 200
- PARTEngine gasket setSearch: Rover 200 1995 engine gasket set
- TOOLTorque wrenchSearch: 3/8 inch torque wrench
- TOOLFeeler gauge setSearch: feeler gauge set
Links open Amazon search results in a new tab. As an Amazon Associate I earn from qualifying purchases.