
Models with air conditioning fitted
- Make
- Rover
- Model
- 200 Workshop Manual
- Year
- 1995–1999
- Section
- Repairs › Models with air conditioning fitted
Engine - L SeriesModels with air conditioning fitted · page 1 of 6
- Clean mating faces of camshaft carrier and camshaft cover.
- Ensure bolt holes in camshaft carrier are clean and dry.
- Fit new gasket, dry, to camshaft cover.
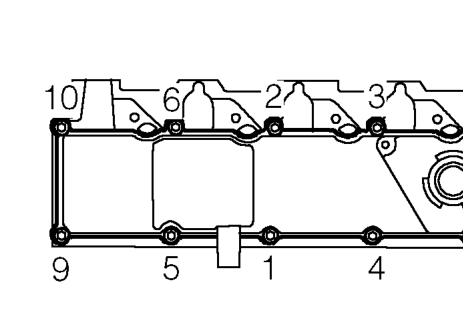
- Fit camshaft cover.
- Fit camshaft cover bolts and working in the sequence shown, tighten to 12 Nm.
- Connect glow plug feed lead to No.2 glow plug, fit and tighten nut.
- Remove plugs from FIP and injectors.
- Position injector pipes and connect unions to FIP and injectors, tighten unions to 28 Nm.
CAUTION: To prevent damage to fuel system pipes or components use 2 spanners when tightening unions.
- Connect spill return pipes to injectors, tighten unions to 10 Nm.
- Connect injector needle lift sensor multiplug to harness and secure to bracket on injection pump.
- Connect radiator top hose to coolant outlet elbow and tighten clip.
- Align dipstick tube bracket to coolant outlet elbow, fit bolt and tighten to 25 Nm.
- Connect engine coolant temperature gauge sensor Lucar to harness.
- Connect multiplug to ECT sensor.
Models with air conditioning fitted
- Position alternator top mounting bracket to coolant outlet elbow, fit bolts and tighten to 25 Nm.
- Fit bolt securing alternator to mounting bracket and tighten to 25 Nm.
All models
- Connect hose to brake servo vacuum pipe and secure with clip.
- Align brake servo vacuum pipe to coolant outlet elbow, fit bolt and tighten to 25 Nm.
- Fit bolt securing vacuum pipe to camshaft cover and tighten to 10 Nm.
- Position FIP timing belt backplate and bracket to cylinder head, fit bolts and tighten to 8 Nm.
- Clean tensioner pulley.
- Fit tensioner pulley to locating dowel, fit Allen bolt but do not tighten.
- Position camshaft timing belt back cover to cylinder head and block, fit bolts and tighten to 8 Nm.
- Align engine harness to back cover and secure with clips.
- Clean camshaft gear and mating face.
- Locate camshaft gear on camshaft.
- Fit new camshaft gear retaining bolt but do not tighten at this stage.
CAUTION: Ensure camshaft does not rotate.
NOTE: Bolt is tightened after timing belt has been tensioned. Do not fit timing belt at this stage.
- Clean FIP timing belt drive gear and mating face.
- Locate FIP timing belt drive gear on camshaft.
- Fit new FIP timing belt drive gear retaining bolt but do not tighten at this stage.
CAUTION: Ensure camshaft does not rotate.
NOTE: Bolt is tightened after FIP timing belt has been tensioned. Do not fit timing belt at this stage.
Parts & tools for this job For 1995 Rover 200
- TOOLA/C manifold gauge setSearch: AC manifold gauge set
- TOOLUV leak detection kitSearch: AC UV leak detection kit
- PARTCabin filterSearch: Rover 200 1995 cabin filter
Links open Amazon search results in a new tab. As an Amazon Associate I earn from qualifying purchases.