
Engine sump gasket (page 2 of 2)
- Make
- Rover
- Model
- 200 Workshop Manual
- Year
- 1995–1999
- Section
- Repairs
Engine - L SeriesEngine sump gasket · page 2 of 2
Refit
- Ensure bolt holes in cylinder block are clean and dry.
- Clean sump and cylinder block mating faces.
- Remove all traces of sealant from rear oil seal housing, rear main bearing cap, cylinder block and front main bearing cap using suitable solvent.
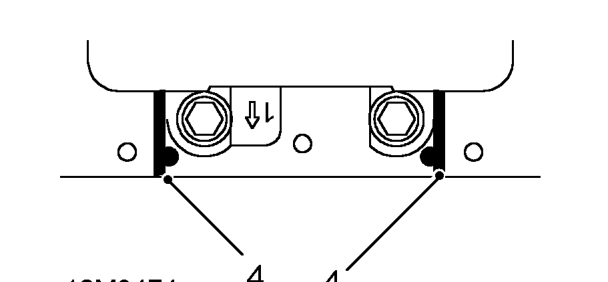
- Using sealant from kit, Part Number GUG 705963GM, fill grooves on each side of front main bearing cap and along joint lines of bearing cap and cylinder block.
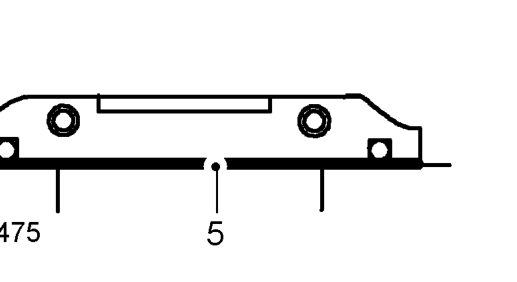
- Apply a 1 mm thick bead of sealant from kit to joint line and around bolt holes of crankshaft rear oil seal housing, rear main bearing cap and cylinder block and sump bolt holes adjacent to rear main bearing cap.
CAUTION: Do not apply sealant until immediately prior to fitting sump. Do not spread sealant bead.
- Fit gasket to sump.
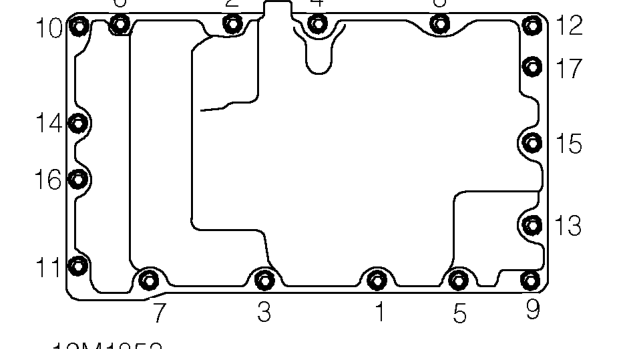
- Fit sump to cylinder block, fit and finger tighten 17 bolts.
- Using sequence shown, tighten bolts to 25 Nm.
- Using same sequence, check that all bolts are torqued to 25 Nm.
- Fit bolt securing oil pipe to sump.
- Connect vacuum pump oil drain pipe to sump.
- Fit bolt securing sump to gearbox support bracket and tighten to 85 Nm.
- Fit engine steady bar. See this section.
- Fit new oil filter. See this section.
- Remove stand(s) and lower vehicle.
Parts & tools for this job For 1995 Rover 200
- PARTEngine gasket setSearch: Rover 200 1995 engine gasket set
- TOOLTorque wrenchSearch: 3/8 inch torque wrench
- TOOLFeeler gauge setSearch: feeler gauge set
Links open Amazon search results in a new tab. As an Amazon Associate I earn from qualifying purchases.