
Replacement
- Make
- Rover
- Model
- 400 Body Repair Manual
- Year
- 1995–2000
- Section
- Repairs › Replacement
Panel repairsReplacement · page 1 of 4
Replacement
- Remove the related parts:
- Bonnet
- Front wing
- Front door
- Windscreen
- Front side trim
- Door opening trim
- Side cowl lining
- Dashboard
- Front pillar trim
- Wire harness, etc.
- Steering column
NOTE: Make sure that the right and left pillars are parallel with the windscreen surface. Check the door for proper opening and closing.
- Pull out and straighten the damaged area.
- Pull out the damaged area with the frame straightener before cutting off the front pillar extension and front pillar.
NOTE: Pull out until the pillar is lined up with the surface of the windscreen.
- With the pillar pulled out, pull out and straighten the related lower dashboard and floor section.
- After pulling, check the inner pillar position using the body dimensional drawings.
- Remove the inner wing upper member.
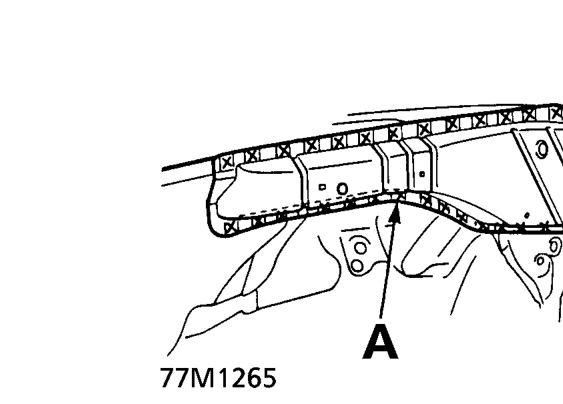
A. Inner wing Upper Member
- Cut off the front pillar.
- Cut off the front pillar along the bold line shown in illustration 77M1267 with a spot weld cutter.
- Use a handsaw to cut the windscreen and side sill areas.
NOTE: Be careful not to cut the inner section.
• Centre punch around the spot weld imprints. • Drill holes using a spot cutter. • Chisel off the weld flanges. • Finish the burrs at the drilled areas with a disc sander.
WARNING: To prevent eye injury, wear goggles or safety glasses whenever sanding, cutting or grinding.
Parts & tools for this job For 1995 Rover 400
- TOOLTorque wrenchSearch: 3/8 inch torque wrench
- TOOLSocket setSearch: socket set metric
- BOOKHaynes manualSearch: Haynes manual Rover 400
Links open Amazon search results in a new tab. As an Amazon Associate I earn from qualifying purchases.