
Oil pump (page 3 of 3)
- Make
- Rover
- Model
- 200 Workshop Manual
- Year
- 1995–1999
- Section
- Repairs
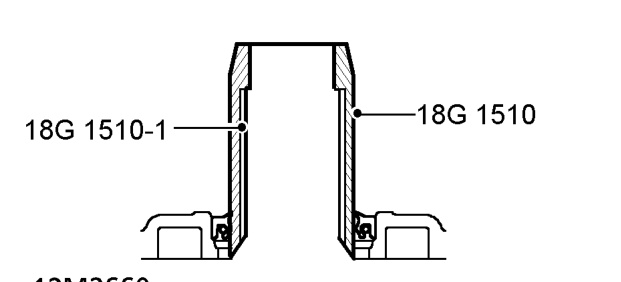
- Fit oil seal protector 18G 1510 and adaptor sleeve 18G 1510 -1 on crankshaft.
NOTE: This will assist in locating oil pump inner rotor on Woodruff key. Replacement oil pumps are supplied with crankshaft front oil seal fitted. A new oil seal is fitted to existing oil pumps after pump is fitted. Do not lubricate oil seal or running surface on crankshaft.
- Slide oil pump over crankshaft ensuring Woodruff key is located in keyway in inner rotor.
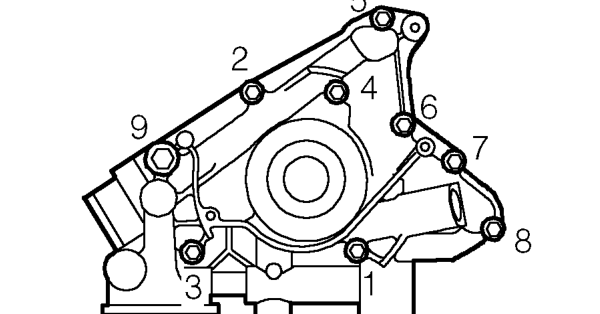
- Fit but do not tighten bolts ensuring that longest bolt is fitted at position 1.
- Gradually tighten bolts in sequence shown until oil pump is pulled against cylinder block.
CAUTION: Bolt tightening must be carried out gradually due to tight fit of oil pump rotor on crankshaft. Damage to the oil pump will result if this is not done.
- Finally, tighten bolts in sequence shown to: M10 bolt - 45 Nm M6 bolts - 10 Nm
NOTE: Patchlok bolts may be re-used providing threads are undamaged.
- Existing oil pump: Fit new crankshaft front oil seal. See this section.
- Fit new oil filter. See this section.
- Fit oil pressure switch. See this section.
- Fit ’O’ ring to turbocharger oil feed pipe.
- Fit pipe to oil pump housing and tighten union to 10 Nm.
- Fit ’O’ rings to oil cooler pipes.
- Connect pipes to pump housing and tighten unions to 25 Nm.
- Clean crankshaft timing gear and slide onto crankshaft.
- Fit lower half of timing belt rear cover and tighten bolts to 8 Nm.
- Apply Loctite 275 to threads of idler pulley nut.
- Fit idler pulley to cylinder block and tighten nut to 45 Nm.
NOTE: If stud was unscrewed during nut removal, clean old Loctite from threads of stud and ensure hole in cylinder block is clean and dry. Apply Loctite 275 to threads of stud. Fit stud and tighten to 12 Nm.
- Fit camshaft timing belt and adjust tension. See this section.
- Refill engine with oil. See MAINTENANCE.
- Connect battery earth lead.
- Fit road wheel(s) and tighten nuts to correct torque. See INFORMATION, Torque wrench settings.
- Remove stand(s) and lower vehicle.
Parts & tools for this job For 1995 Rover 200
- PARTOil filterSearch: Rover 200 1995 oil filter
- TOOLOil filter wrenchSearch: oil filter wrench
- FLUIDEngine oilSearch: Rover 200 engine oil
Links open Amazon search results in a new tab. As an Amazon Associate I earn from qualifying purchases.