
2.0 petrol and diesel models (page 3 of 4)
- Make
- Rover
- Model
- 400 Body Repair Manual
- Year
- 1995–2000
- Section
- Repairs
Panel repairs2.0 petrol and diesel models · page 3 of 4
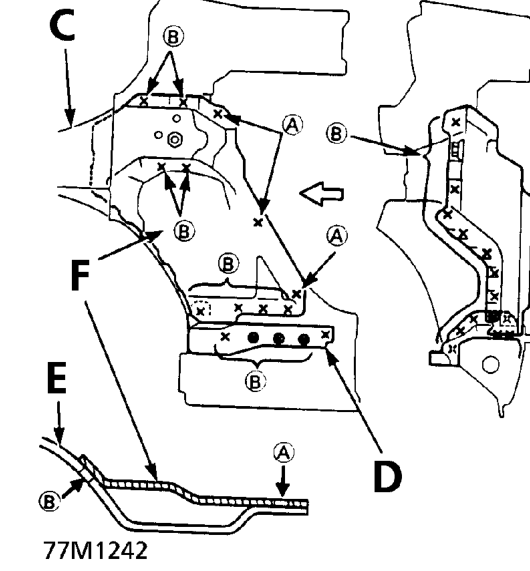
A. Drill holes with a spot cutter from the rear support stiffener side. B. Drill holes with a spot cutter from the front side outrigger side. C. New Front Side Frame D. Inside Sill Extension E. Front Side Outrigger F. Rear Support Stiffener
NOTE: Be careful not to let drill holes penetrate through to the new part.
- Keep the holes to a minimum since they will be used as weld holes for MIG welding of new part.
- Set the new rear support stiffener in the original position properly and place a jack under the rear support stiffener for support.
- Remove the undercoat from both sides of the welding section, and expose the steel plate using a disc sander.
WARNING: To prevent eye injury, wear goggles or safety glasses whenever sanding, cutting or grinding.
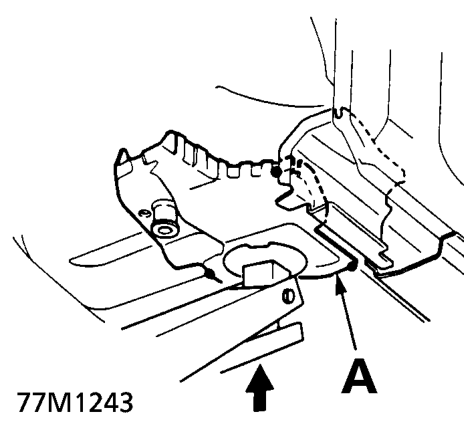
A. New Rear Support Stiffener
- Check the position of the rear support stiffener using the body dimensional drawings.
- Temporarily weld the mating surfaces with the dashboard lower and inside sill extension.
WARNING: To prevent eye injury and burns when welding, wear an approved welding helmet, gloves and safety shoes.
Parts & tools for this job For 1995 Rover 400
- PARTGlow plugsSearch: Rover 400 1995 glow plugs
- TOOLGlow plug socketSearch: glow plug socket
- TOOLDiesel compression testerSearch: diesel compression tester
Links open Amazon search results in a new tab. As an Amazon Associate I earn from qualifying purchases.