Workshop Manuals Factory service & repair Rover
01 Information02 General data03 Engine04 Engine management system – PGM-Fi05 Cooling system, manifold and exhaust06 Clutch07 Manual gearbox08 Automatic gearbox09 Drive shafts10 Differential – manual gearbox11 Differential – automatic gearbox12 Steering13 Suspension14 Brakes and ABS15 Brakes – ABS BY416 Body17 Heating and ventilation18 Electrical19 Supplementary restraint system (SRS)
Rover Rover 600 Repair Manual - Volumes 1 and 2 - 2nd Edition08 · Automatic gearbox
08 · Transmission

Adjust (page 2 of 2)

Make
Rover
Model
600 Rover 600 Repair Manual - Volumes 1 and 2 - 2nd Edition
Section
Repairs
Automatic gearboxAdjust · page 2 of 2
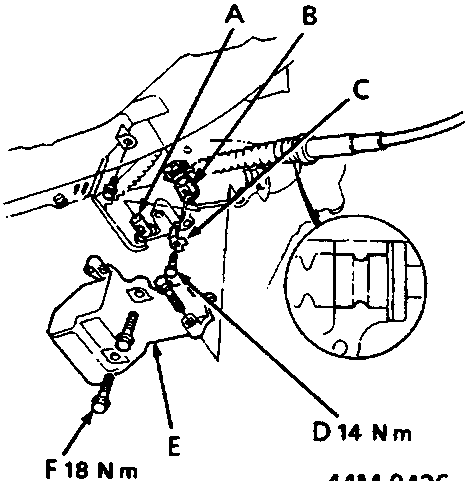
Diagram showing control shaft, control lever, lock washer, control lever bolt, cable cover, and cable cover bolts with torque values D 14 Nm and F 18 Nm
A Control shaft B Control lever C Lock washer D Control lever bolt – M8 E Cable cover F Cable cover bolts – M8 5. Remove the cable cover. 6. Remove the lock bolt securing the control lever then remove the control lever and selector cable.
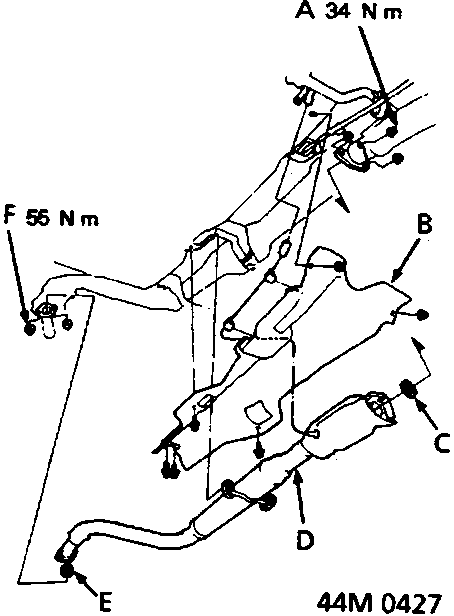
Diagram showing self-locking nut, heat shield, gasket, exhaust pipe A, and another gasket with torque values A 34 Nm and F 55 Nm
A Self – locking nut B Heat shield C Gasket D Exhaust pipe A E Gasket F Self – locking nut 7. Remove the exhaust pipe A and heat shield, discard self – locking nuts and gaskets.
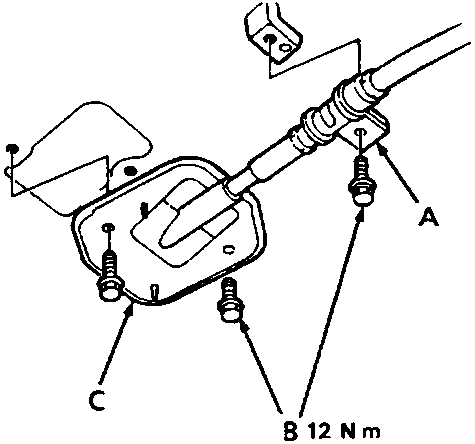
Diagram showing cable guide, bolts, and grommet with torque value B 12 Nm
A Cable guide B Bolts C Grommet 8. Remove the cable guide and grommet.

Parts & tools for this job For Rover 600

Links open Amazon search results in a new tab. As an Amazon Associate I earn from qualifying purchases.