
Engine RH mounting
- Make
- Rover
- Model
- 600 Repair Manual Supplement
- Year
- 1993–1999
- Section
- Repairs › Engine RH mounting
Engine - L SeriesEngine RH mounting
ENGINE RH MOUNTING
Service repair no - 12.45.12
Remove
- Remove front centre underbelly panel. See BODY, Exterior fittings.
- Position block of wood or hard rubber to jack.
- Support engine on jack.
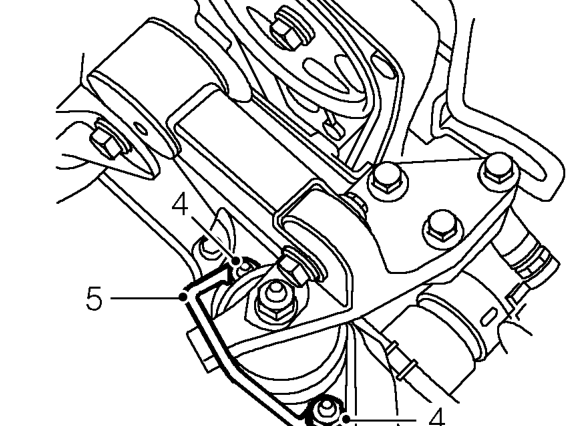
- Remove nuts securing engine mounting restraint bar to mounting.
- Remove restraint bar.
- Remove engine steady bar. See this section.
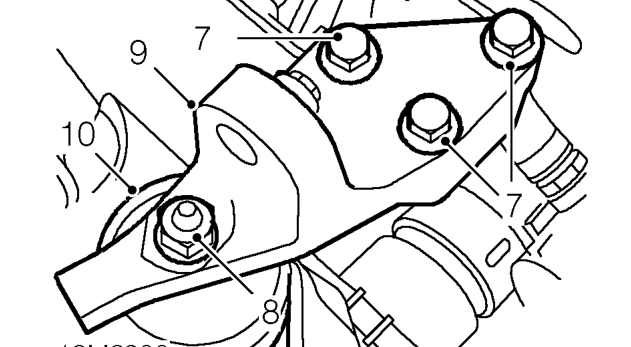
- Remove 3 bolts securing mounting bracket to engine.
- Remove nut securing mounting bracket to mounting.
- Remove bracket.
- Remove mounting.
Refit
- Clean engine mounting bracket, dowels and dowel holes.
- Fit mounting.
- Fit mounting bracket.
- Fit bolts securing mounting bracket to engine and tighten to 105 Nm.
- Fit nut securing bracket to mounting but do not tighten at this stage.
- Fit mounting restraint bar.
- Fit nuts securing restraint bar to mounting and tighten to 45 Nm.
- Remove support from engine and remove block of wood.
- Tighten nut securing engine bracket to mounting to 105 Nm.
- Fit engine steady bar. See this section.
- Fit front centre underbelly panel. See BODY, Exterior fittings.
- Lower vehicle and remove trolley jack.
Parts & tools for this job For 1993 Rover 600
- PARTEngine gasket setSearch: Rover 600 1993 engine gasket set
- TOOLTorque wrenchSearch: 3/8 inch torque wrench
- TOOLFeeler gauge setSearch: feeler gauge set
Links open Amazon search results in a new tab. As an Amazon Associate I earn from qualifying purchases.