
Models with air conditioning
- Make
- Rover
- Model
- 600 Repair Manual Supplement
- Year
- 1993–1999
- Section
- Repairs › Models with air conditioning
Engine - L SeriesModels with air conditioning
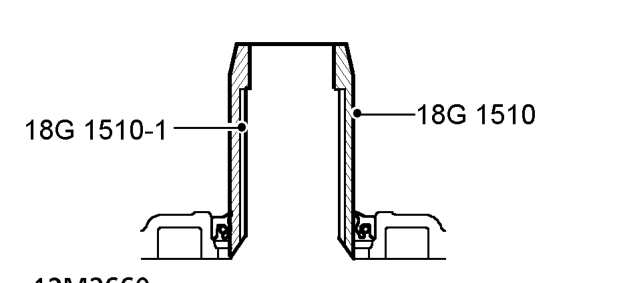
- fit oil seal protector 18G 1510 and adaptor sleeve 18G 1510-1 on crankshaft
NOTE: This will assist in locating oil pump inner rotor on Woodruff key.
- Slide oil pump over crankshaft ensuring Woodruff key is located in keyway in inner rotor.
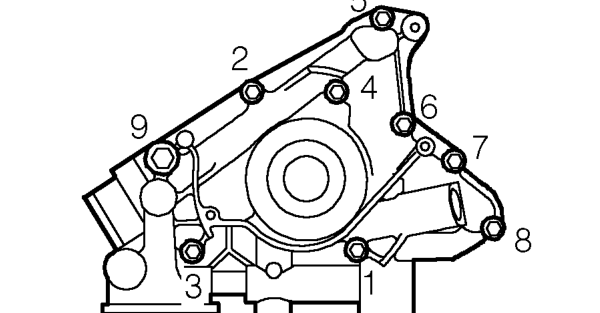
- Fit but do not tighten bolts ensuring that longest M6 bolt is fitted at position 1.
- Gradually tighten bolts in sequence shown until oil pump is pulled against cylinder block.
CAUTION: Bolt tightening must be carried out gradually due to tight fit of oil pump rotor on crankshaft. Damage to the oil pump will result if this is not done.
- Finally, tighten bolts in sequence shown to: M10 bolt - 45 Nm. M6 bolts - 10 Nm.
NOTE: Patchlok bolts may be re-used providing threads are undamaged.
- Existing oil pump: Fit new crankshaft front oil seal. See this section.
- Ensure sealing strips are fitted to camshaft timing belt bottom backplate.
- Fit bottom backplate, fit screws and tighten to 8 Nm.
- Remove plugs from cooler and turbocharger feed pipes.
- Clean oil cooler pipe and turbocharger feed pipe connections.
- Fit new ’O’ rings to pipes.
- Connect turbocharger oil feed pipe to pump and tighten union nut to 25 Nm.
- Align pipe clip to cylinder block and tighten bolt.
- Connect oil cooler pipe to pump and tighten union nut to 25 Nm. Align pipe clips to sump and fit bolts.
- Connect oil cooler pipe to pump and tighten union nut to 25 Nm.
- Align pipe clip to coolant pump mounting and fit bolt.
- Lubricate oil filter seal with clean engine oil.
- Fit oil filter and tighten to 17 Nm.
- Clean timing belt idler pulley and mating face.
- Fit camshaft timing belt idler pulley ensuring that recessed side of centre boss faces away from engine.
- Apply Loctite 275 to threads of idler pulley nut, fit nut and tighten to 45 Nm.
NOTE: If stud was unscrewed during nut removal, clean old Loctite from threads of stud and ensure hole in cylinder block is clean and dry. Apply Loctite 275 to threads of stud and fit it into block, tighten stud to 12 Nm.
- Clean crankshaft gear.
- Slide timing gear on to crankshaft.
- Fit camshaft timing belt and adjust tension. See this section.
Models with air conditioning
- Connect oil temperature switch multiplug.
All models
- Connect multiplug to oil pressure switch
- Check and top up engine oil.
Parts & tools for this job For 1993 Rover 600
- TOOLA/C manifold gauge setSearch: AC manifold gauge set
- TOOLUV leak detection kitSearch: AC UV leak detection kit
- PARTCabin filterSearch: Rover 600 1993 cabin filter
Links open Amazon search results in a new tab. As an Amazon Associate I earn from qualifying purchases.