
Models with air conditioning
- Make
- Rover
- Model
- 600 Repair Manual Supplement
- Year
- 1993–1999
- Section
- Repairs › Models with air conditioning
Engine - L SeriesModels with air conditioning
- Fit cylinder head onto cylinder block, carefully locating onto dowels.
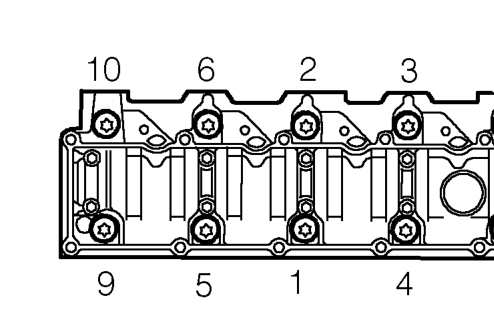
- Fit cylinder head bolts in their original fitted order, do not drop bolts into cylinder block.
- Tighten the cylinder head bolts progressively in the sequence shown, using the following procedure. 1. Tighten all bolts to 30 Nm. 2. Tighten all bolts to 65 Nm. 3. Tighten each bolt through 90°. 4. Tighten each bolt through a further 90°.
CAUTION: Ensure that correct tightening sequence is followed for all four tightening stages. Do not tighten bolts 180 °in one operation.
- Clean camshaft cover and mating face on camshaft carrier.
- Fit new gasket to camshaft cover.
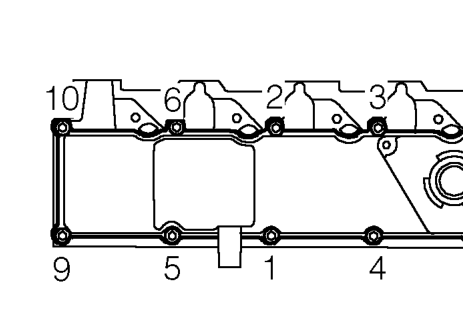
- Ensure bolt holes in camshaft carrier are clean and dry.
- Fit camshaft cover and tighten bolts in sequence shown to 12 Nm.
- Position timing belt back cover, fit and tighten bolts to 8 Nm.
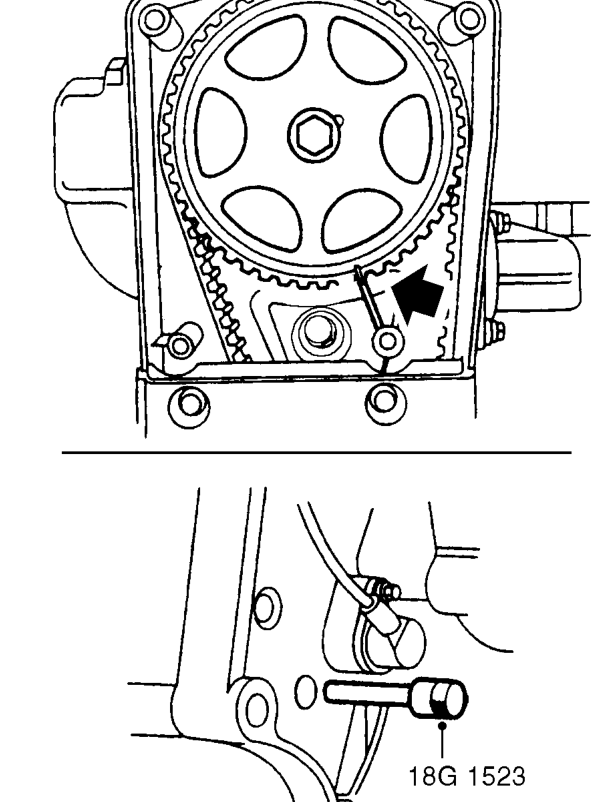
- Temporarily fit camshaft gear, rotate camshaft until timing mark is aligned with mark on back cover, remove camshaft gear.
- Carefully rotate crankshaft clockwise until timing pin 18G 1523 can be inserted in hole in flywheel. Remove pulley bolt.
CAUTION: Do not rotate crankshaft too far, pistons may contact valves.
- Connect glow plug feed leads and tighten nuts to 2.5 Nm.
- Fit injector pipes. See ENGINE MANAGEMENT SYSTEM - EDC, Repairs.
- Connect top hose to engine and tighten hose clip.
- Connect coolant temperature sensor multiplug and transmitter leads.
Models with air conditioning
- Fit alternator upper fixing bolt and tighten to 25 Nm.
Parts & tools for this job For 1993 Rover 600
- TOOLA/C manifold gauge setSearch: AC manifold gauge set
- TOOLUV leak detection kitSearch: AC UV leak detection kit
- PARTCabin filterSearch: Rover 600 1993 cabin filter
Links open Amazon search results in a new tab. As an Amazon Associate I earn from qualifying purchases.