
WINGS [FENDERS] Cleaning/painting
- Make
- Land Rover
- Model
- Discovery Body Repair Manual
- Year
- 1995 on
- Section
- Repair › WINGS [FENDERS] Cleaning/painting
Chassis and bodyWINGS [FENDERS] Cleaning/painting
WINGS [FENDERS] Cleaning/painting
Service repair no - 76.10.24 10. Thoroughly clean all traces of existing sealant
Remove
- Paint the cleaned surfaces with etch primer.
- Disconnect battery negative lead. 12. If the existing wing [fender] is to be refitted
- Remove the headlamp surround.
- Remove the front bumper assembly.
- Remove the indicator repeater light.
- Remove the four screws securing the wing Refit [fender] at the ’A’ post.
- Remove the bolts securing the bottom of the 13. Apply 3M 8572 Bolted Panel Sealer to the joint wing [fender] at the bumper retaining bracket and at the sill finisher.
- If removing the RH wing [fender] loosen the 14. Refit the wing [fender], on RH wings [fenders] fit radio aerial securing nut.
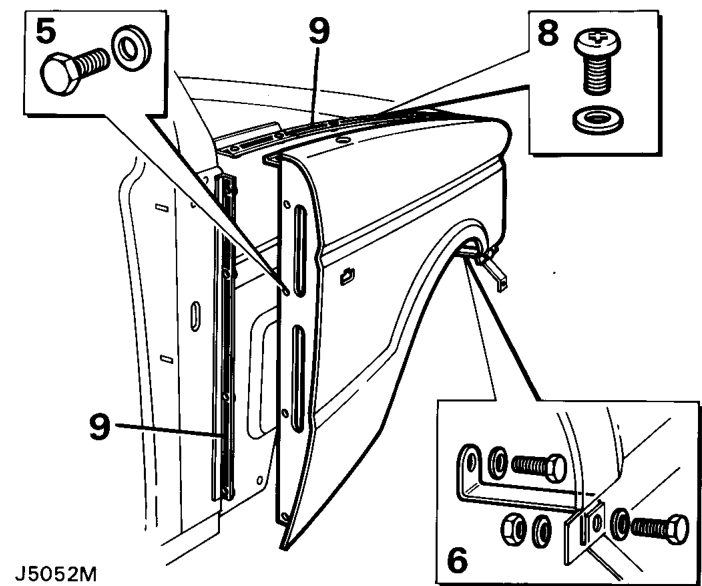
- Remove the seven bolts from the drain channel in the top of the wing [fender].
- Break the sealed joints at the valance and ’A’ post; then complete the removal of the wing [fender]. If removing a RH wing withdraw the wing [fender] sufficiently to allow removal of the aerial before completing the removal.
from the sealing faces of the valance and ’A’ post.
repeat the cleaning and painting procedure on the wing [fender] sealing surfaces.
faces on the valance and ’A’ post and to the bracket face.
the radio aerial, and secure with the bolts and screws ensuring that the wing [fender] correctly aligns with the bonnet [hood].
Parts & tools for this job For 1995 Land Rover Discovery
- TOOLTrim removal tool kitSearch: trim removal tool kit
- PARTTouch-up paintSearch: Land Rover touch up paint
- PARTPanel clip assortmentSearch: Land Rover panel clips assortment
Links open Amazon search results in a new tab. As an Amazon Associate I earn from qualifying purchases.