
Auxiliary drive belt - ’l’ series
- Make
- Rover
- Model
- 200 Workshop Manual
- Year
- 1995–1999
- Section
- Repairs › Auxiliary drive belt - ’l’ series
ElectricalAuxiliary drive belt - ’l’ series
AUXILIARY DRIVE BELT - ’L’ SERIES
Service repair no - 86.10.03
Remove
- Raise front of vehicle.
WARNING: Support on safety stands.
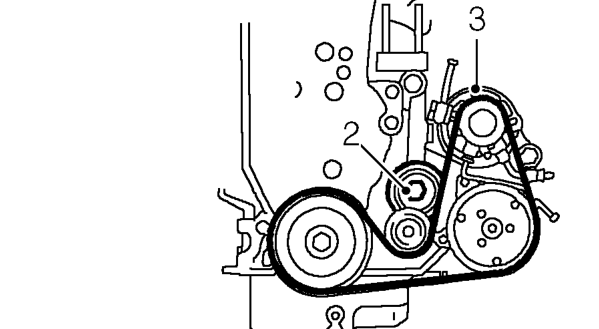
- Using a 15 mm ring spanner on drive belt tensioner pulley bolt, rotate pulley fully clockwise and hold.
- With assistance, release drive belt from alternator pulley.
- Remove drive belt from remaining pulleys and remove from vehicle.
Refit
- Clean drive belt pulley grooves and ensure grooves are not damaged.
- Fit new drive belt around pulleys, except alternator pulley, ensure belt is correctly aligned in pulley grooves.
- Hold tensioner pulley fully clockwise, with assistance fit drive belt around alternator pulley.
- Remove stand(s) and lower vehicle.
AUXILIARY DRIVE BELT TENSIONER - ’L’ SERIES
Service repair no - 86.10.06
Remove
- Remove auxiliary drive belt. See this section.
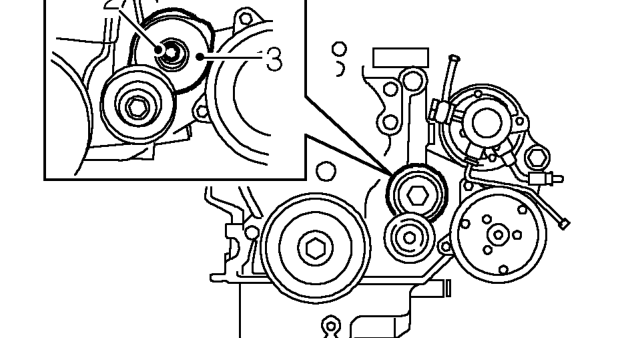
- Remove centre bolt securing tensioner to mounting bracket.
- Remove tensioner.
Refit
- Clean tensioner and mating face.
- Locate tensioner on dowel. Fit and tighten centre bolt to 45 Nm.
- Fit auxiliary drive belt. See this section.
Parts & tools for this job For 1995 Rover 200
- TOOLDigital multimeterSearch: automotive digital multimeter
- PARTAssorted fuse kitSearch: car fuse assortment kit
- TOOLWire crimper and connector kitSearch: wire crimper connector kit
Links open Amazon search results in a new tab. As an Amazon Associate I earn from qualifying purchases.