
Auxiliary drive belt - ’k’ series without power steering
- Make
- Rover
- Model
- 200 Workshop Manual
- Year
- 1995–1999
- Section
- Repairs › Auxiliary drive belt - ’k’ series without power steering
ElectricalAuxiliary drive belt - ’k’ series without power steering
- Lower engine on jack until horizontal in engine compartment
- Fit engine mounting bracket to engine mounting and engine.
- Fit bolts securing engine mounting bracket to engine and tighten to 100 Nm.
- Fit nut securing mounting bracket to engine mounting and tighten to 85 Nm.
- Tighten nuts, engine mounting restraint bar to body, to 80 Nm.
- Connect RH steady bar to engine mounting bracket, fit through bolt and tighten to 85 Nm.
- Tighten bolt, RH steady bar to body, to 80 Nm.
- Remove jack positioned to support engine.
- Align dipstick tube to coolant outlet elbow, fit bolt and tighten to 10 Nm.
- Position alternator top mounting bracket to coolant outlet elbow, fit bolts and tighten to 25 Nm.
- Align alternator to top mounting bracket, fit bolt and tighten to 25 Nm.
- Tighten alternator lower mounting bolt to 45 Nm.
- Connect PAS high pressure hose to pump and tighten union to 20 Nm.
- Connect hose to brake servo vacuum pump and secure hose with clip.
- Align vacuum pipe to camshaft cover and tighten bolt to 10 Nm.
- Remove drain tin from beneath vehicle.
- Connect battery cable to alternator stud, tighten nut to 4 Nm and position cover.
- Connect multiplug to alternator.
- Fit engine acoustic cover. See BODY, Exterior fittings.
- Fit auxiliary drive belt. See this section.
- Fit undertray. See BODY, Exterior fittings.
- Remove stand(s) and lower vehicle.
- Connect battery earth lead.
- Bleed power steering system. See STEERING, Adjustments.
AUXILIARY DRIVE BELT - ’K’ SERIES WITHOUT POWER STEERING
Service repair no - 86.10.03
Remove
- Raise front of vehicle.
WARNING: Support on safety stands.
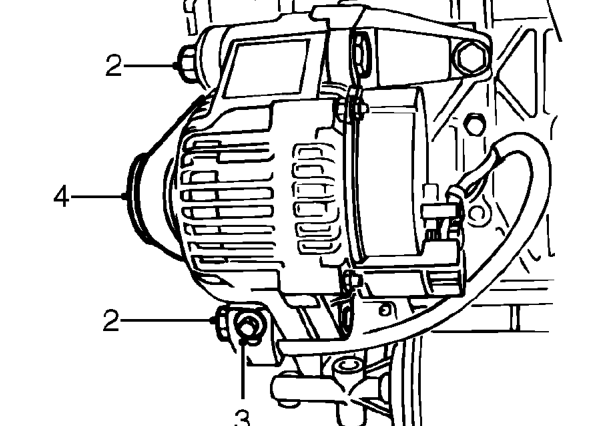
- Loosen 2 alternator mounting bolts.
CAUTION: Ensure that bolts are loosened sufficiently for alternator to move freely.
- Release drive belt tension by turning the tension adjusting bolt anti-clockwise.
CAUTION: Do not apply excessive torque to adjusting bolt or damage to bolt will result. If bolt appears to be seized or is difficult to turn, apply suitable anti-seize lubricant to bolt.
- Release drive belt from alternator pulley.
- Remove drive belt.
Refit
- Clean pulley ’V’s.
- Fit drive belt to crankshaft pulley and connect to alternator pulley. Ensure grooves on pulleys and drive belt are correctly located.
- Adjust drive belt tension. See Adjustments.
- Remove stand(s) and lower vehicle.
Parts & tools for this job For 1995 Rover 200
- TOOLTie rod end toolSearch: tie rod end puller
- TOOLBall joint separatorSearch: ball joint separator
- FLUIDPower steering fluidSearch: Rover power steering fluid
Links open Amazon search results in a new tab. As an Amazon Associate I earn from qualifying purchases.