
Cylinder head gasket - LH (page 4 of 4)
- Make
- Rover
- Model
- 800 Workshop Manual
- Year
- 1996–1999
- Section
- Repairs
Engine - KV6Cylinder head gasket - LH · page 4 of 4
Refit
- Clean manifold flange mating faces.
- Thoroughly clean cylinder block and cylinder head mating faces.
- Thoroughly clean cylinder head bolts and wipe dry.
- Lightly lubricate threads and under heads of bolts with clean engine oil.
- Ensure locating dowels are in cylinder block.
- Fit new cylinder head gasket onto cylinder block with word ’TOP’ uppermost.
- Fit new gasket to exhaust manifold flange.
- Using assistance, fit cylinder head, carefully locating front manifold to rear manifold flange and cylinder head to dowels.
- Carefully enter cylinder head bolts, DO NOT DROP. Screw bolts into place by hand.
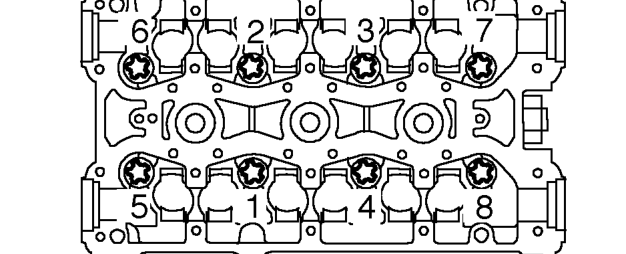
- Tighten cylinder head bolts progressively in sequence shown to 25 Nm. Tighten bolts in sequence shown a further 90°.
- Clean mating surfaces of camshaft cover and carrier.
- Clean inside of camshaft cover. If necessary, wash oil separator gauze and blow dry.
CAUTION: When fitting new camshaft cover gasket ensure arrows point towards inlet manifold.
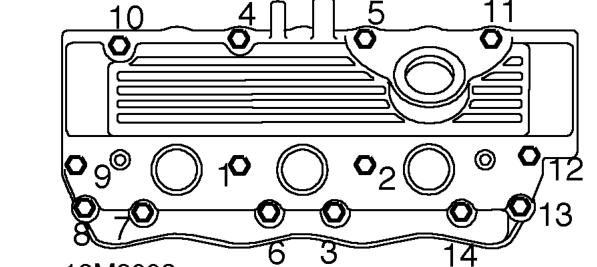
- Fit gasket and position camshaft cover to carrier. Fit bolts and tighten progressively in sequence shown to 9 Nm.
- Fit manifold nuts and tighten to 45 Nm.
- Fit bleed hose and secure with clips.
- Remove and discard lower ’O’ rings from injectors.
- Clean injectors and injector locations in fuel rail.
- Lubricate new ’O’ rings with clean engine oil and fit to injectors.
- Position fuel rail assembly, connect inlet air temperature sensor, secure injectors to manifolds. Fit bolts securing fuel rail and tighten to 9 Nm.
- Secure harness clip to engine lifting bracket.
- Position harness bracket to camshaft cover, fit bolt and tighten to 9 Nm.
- Connect camshaft sensor, coolant temperature sensor and oxygen sensor multiplugs.
- Secure fuel pipes to clips.
- Fit bolt securing fuel return pipe to inlet manifold and tighten to 9 Nm .
- Position expansion tank pipe, connect bleed hoses to ’T’ piece and secure with clips.
- Connect coil multiplugs, align mounting plate to manifold, fit bolts and tighten to 9 Nm.
- Fit breather hoses to camshaft cover.
- Connect h.t. leads to spark plugs and secure leads to clips.
- Clean timing cover backplate bolts and apply Loctite 242 to first 3 threads.
- Ensure seal is fitted correctly to timing cover backplate. Position backplate, fit bolts and tighten to 9 Nm.
- Clean and thoroughly dry timing gear and hub.
- Fit timing gear and hub and fit bolt. Tighten bolt sufficiently to allow gear to rotate without tipping.
- Fit camshaft timing belt. See this section.
- Refill cooling system. See COOLING SYSTEM - ’KV6’, Adjustments.
Parts & tools for this job For 1996 Rover 800
- PARTEngine gasket setSearch: Rover 800 1996 engine gasket set
- TOOLTorque wrenchSearch: 3/8 inch torque wrench
- TOOLFeeler gauge setSearch: feeler gauge set
Links open Amazon search results in a new tab. As an Amazon Associate I earn from qualifying purchases.