
Camshaft timing belt - air conditioning (page 6 of 6)
- Make
- Rover
- Model
- 800 Workshop Manual
- Year
- 1996–1999
- Section
- Repairs
Engine - KV6Camshaft timing belt - air conditioning · page 6 of 6
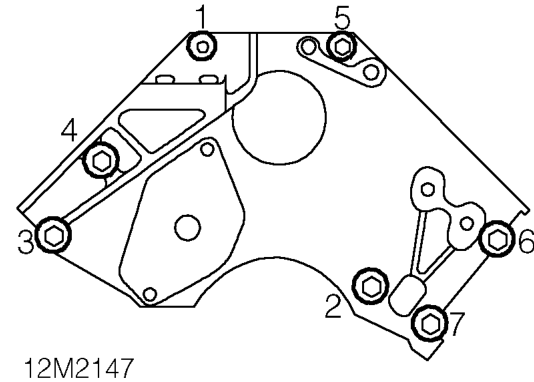
- Tighten engine mounting bracket bolts in the sequence shown to the following torques: Bolt 1 32 Nm. Bolt 5 45 Nm. Bolts 2, 3, 4, 6 and 7 85 Nm.
- Fit bolts securing compressor mounting bracket to engine mounting bracket and tighten to 45 Nm.
- Align compressor to bracket, position heatshield, fit bolts and tighten to 25 Nm.
- Position ancillary belt tensioner, fit bolts and tighten to 25 Nm.
- Fit blanking plugs to engine mounting bracket.
- Automatic models: Clean and refit gearbox fluid dip stick.
- Clean lower timing belt cover.
- Fit cover, fit bolts and tighten to 9 Nm.
- Clean crankshaft pulley.
- Fit crankshaft pulley to crankshaft gear.
CAUTION: Ensure indent on pulley locates over lug on gear.
- Fit crankshaft pulley bolt and washer, tighten bolt to 160 Nm.
- Remove tool 18G 1746.
- Position PAS pump to bracket, fit bolts and tighten to 25 Nm.
- Clean exhaust camshaft front seal locations and fit new seals.
CAUTION: Sealing edge of seal and mating face must be clean and dry.
- Align dip stick tube bracket to cylinder head, fit bolt and tighten to 9 Nm.
- Fit RH front timing cover taking care not to displace seal.
- Fit 3 bolts securing cover and tighten to 4 Nm.
- Clean spacer and mating face on engine bracket.
- Fit spacer to mounting bracket.
- Fit alternator. See ELECTRICAL, Repairs.
- Fit rear steady bar to brackets, cut-out facing downwards.
- Fit bolt securing steady bar to body bracket, finger tight.
- Fit bolt securing steady bar to engine bracket, locate fork of special nut in bracket peg.
- Tighten both bolts to 85 Nm.
- Fit inlet manifold chamber. See MANIFOLD & EXHAUST SYSTEMS, Repairs.
- Fit LH rear timing belt cover. See this section.
- Fit spark plug cover, fit bolts and tighten to 4 Nm.
- Fit oil filter. See this section.
- Fit splash shield, align PAS hose clip, fit spacer to front bolt and tighten bolts.
- Fit underbelly panel. See BODY, Repairs.
- Fit road wheel(s) and tighten nuts to correct torque. See INFORMATION, Torque wrench settings.
- Remove stand(s) and lower vehicle.
Parts & tools for this job For 1996 Rover 800
- PARTTiming belt kitSearch: Rover 800 1996 timing belt kit
- TOOLEngine timing tool setSearch: Rover engine timing tool set
- TOOLTorque wrenchSearch: 3/8 inch torque wrench
Links open Amazon search results in a new tab. As an Amazon Associate I earn from qualifying purchases.