
Indicator Light Test
- Make
- Rover
- Model
- 600 Rover 600 Repair Manual - Volumes 1 and 2 - 2nd Edition
- Section
- Repairs › Indicator Light Test
ElectricalIndicator Light Test
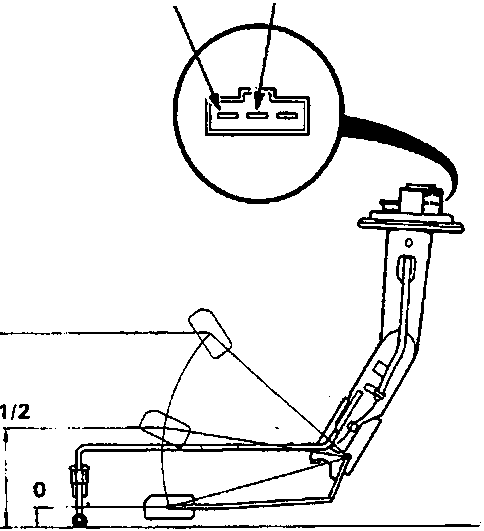
86M 2104
- Support the sending unit on a workbench in the position shown.
- Measure the resistance between the B and C terminals by moving the float to the distances listed for 0 (EMPTY), 1/2 (HALF FULL), and 1 (FULL).
| Floating position | 0 | 1/2 | 1 |
|---|---|---|---|
| Resistance (Ohms) | 105 – 110 | 25.5 – 39.5 | 2 – 5 |
| 0 | 1/2 | 1 |
|---|---|---|
| 17mm (0.66in) |
80mm (3.14in) |
145.5mm (5.73in) |
- If unable to obtain the above readings, replace the fuel gauge sending unit.
Indicator Light Test
Note: Refer to the low fuel indicator circuit diagram.
- Park the car on level ground.
WARNING: Do not smoke while working on the fuel system. Keep open flames away from the work area. Drain fuel only into an approved container.
- Drain the fuel tank into an approved container. Then install the drain bolt with a new washer.
A Low fuel indicator light
86M 2105
- Add less than 8.6 Litres of fuel and turn the ignition switch ON. The low fuel indicator light should come on within four minutes.
- Then add more than 4 Litres. The light should go off within four minutes.
Parts & tools for this job For Rover 600
- TOOLDigital multimeterSearch: automotive digital multimeter
- PARTAssorted fuse kitSearch: car fuse assortment kit
- TOOLWire crimper and connector kitSearch: wire crimper connector kit
Links open Amazon search results in a new tab. As an Amazon Associate I earn from qualifying purchases.