
Adjustment
- Make
- Rover
- Model
- 600 Rover 600 Repair Manual - Volumes 1 and 2 - 2nd Edition
- Section
- Repairs › Adjustment
ElectricalAdjustment · page 1 of 2
- Move the lever back and forth at each position without touching the push button, and check for continuity within the range of free play.
- If there is no continuity within the range of free play, adjust the position of the switch as described below.
Adjustment
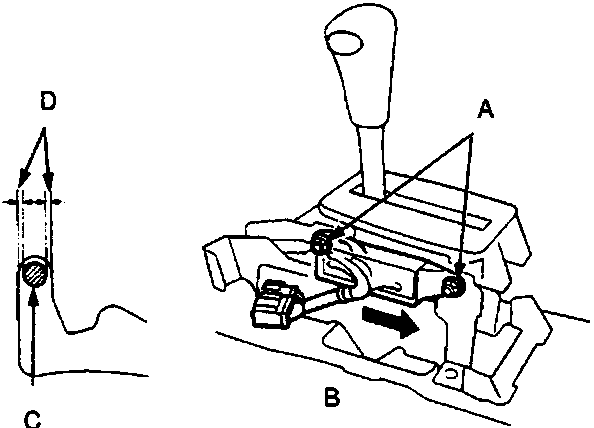
86M 2122
- A Mounting bolts
- B Adjust rearward
- C Lock pin
- D Free play
- Shift to P and loosen the mounting nuts.
- Slide the switch rearward [up to 2.0 mm (0.08 in)] until there is continuity between No. 8 and No. 11 terminals within the range of free play of the gear lever.
- Recheck for continuity between each of terminals.
Note:
- If adjustment is not possible, check for damaged gear lever detent and/or bracket. If there is no damage, replace the A/T gear position switch.
- The engine should start when the gear lever is in P anywhere within the range of free play.
A/T Gear Position Switch
Replacement
- Remove the console, then disconnect the 12-P and 2-P connectors from the switch.
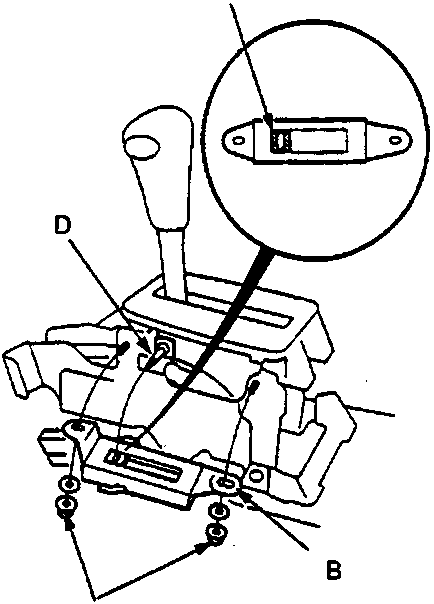
86M 2123
- A Switch slider (in Parking)
- B A/T gear position switch
- C Mounting nuts
- D Pin
- Remove the two mounting nuts and the switch.
- Position the slider of the new switch to "Parking" as shown above.
- Shift the lever to "Parking".
- Attach the switch, and tighten the two mounting nuts.
- Test the switch in the P and N positions.
Note: The engine should start when the gear lever is in P anywhere within the range of free play.
- Connect the 12-P and 2-P connectors, clamp the harness, and install the console.
Parts & tools for this job For Rover 600
- TOOLDigital multimeterSearch: automotive digital multimeter
- PARTAssorted fuse kitSearch: car fuse assortment kit
- TOOLWire crimper and connector kitSearch: wire crimper connector kit
Links open Amazon search results in a new tab. As an Amazon Associate I earn from qualifying purchases.